


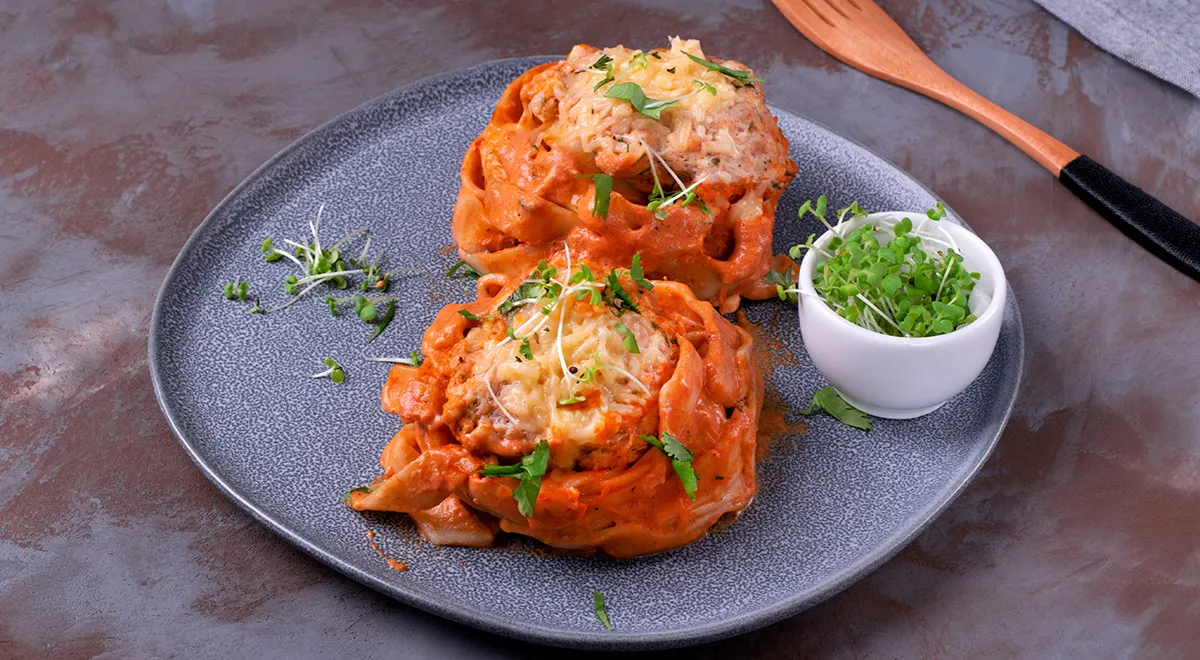
There is something profoundly satisfying about a dish that looks as impressive as it tastes—where each bite reveals layers of flavor and texture. These pasta nests, known in Russia as gnyozda, are precisely that: a delicate ring of al dente pasta cradling a savory meat filling, all bathed in a velvety tomato-cream sauce and crowned with melted mozzarella. Cooked entirely in a single skillet, this recipe transforms humble ingredients into a weeknight showstopper. The technique of briefly blanching the nests before assembling ensures they hold their shape without becoming mushy, while the dual-step onion and garlic preparation builds a deep, aromatic foundation. Whether you are cooking for family or impressing guests, these meat-filled pasta nests deliver both comfort and elegance.
About This Dish
Pasta nests—also called nidi in Italian cuisine—are a versatile vessel for all kinds of fillings. This Russian adaptation leans into hearty, home-style flavors: juicy minced meat, sweet browned onions, and a sauce that balances the acidity of tomato with the richness of cream. The dish is baked or simmered on the stovetop, making it a one-pan wonder. The key to its success lies in the careful handling of the pasta: a quick 20-second blanch softens the nests just enough to mold them, yet they remain sturdy enough to hold the filling. This recipe is perfect for cooks who love efficient kitchen tools and crave a meal that feels both rustic and refined.

Ingredients
- 120 g mozzarella cheese
- 180 g onion (about 1 medium-large)
- 4 cloves garlic
- 300 ml heavy cream (12% fat)
- 2 tbsp tomato paste
- 40 g unsalted butter
- 1 tsp all-purpose flour
- 1 tsp sweet paprika
- Freshly ground black pepper, to taste
- Salt, to taste
- 400 g ground meat (beef, pork, or a mix)
- Pasta nests (about 8–10 pieces)
For a richer texture, consider using high-quality ingredients like organic cream and artisanal mozzarella—they elevate the final dish without extra effort.
Step-by-Step Instructions
1. Prepare the Aromatics
Peel and finely dice the onion and garlic. In a medium skillet, melt half of the butter over moderate heat. Add the onion and sauté for 7 minutes, stirring occasionally, until translucent and lightly golden. Stir in the garlic and cook for 1 minute more. Remove half of this mixture to a bowl and set aside—it will be used later in the sauce.
2. Brown the Meat
Add the ground meat to the skillet with the remaining onion and garlic. Increase the heat to high and cook, breaking up the meat with a spatula, until no pink remains. Season with paprika, salt, and pepper. Stir well, then remove from heat. The meat should be deeply browned but not dry. For perfectly textured meat, a quality food processor can help achieve uniform mincing.
3. Build the Sauce Base
In a deep skillet or sauté pan (about 26 cm diameter), melt the remaining butter over medium heat. Add the reserved onion-garlic mixture and cook for 1 minute. Dissolve the tomato paste in 2/3 cup (160 ml) water. Sprinkle the flour into the pan and stir constantly for 2 minutes to cook out the raw taste. Gradually pour in the tomato-water mixture, then add the cream. Bring to a gentle boil, whisking continuously. Let the sauce thicken for about 1 minute, then remove from heat. A non-toxic immersion blender can be used to emulsify the sauce if desired, though it is perfectly smooth as is.
4. Blanch the Pasta Nests
Bring a small pot of salted water (about 1.5 liters) to a rolling boil. Using a slotted spoon, lower each pasta nest into the water one at a time. Let them cook for exactly 20 seconds—they should soften slightly but still hold their shape. Immediately transfer the blanched nests to the skillet with the sauce, arranging them in a single layer. This quick blanching step is crucial; it softens the pasta just enough to prevent it from breaking during assembly.
5. Assemble and Simmer
Spoon the browned meat mixture evenly into the center of each nest. Cover the skillet with a lid and let it rest off the heat for 10 minutes—this allows the flavors to meld. Then, place the skillet over medium heat (lid still on) and bring the sauce to a gentle simmer. Reduce heat to low and cook for 10 minutes. The pasta will absorb some of the sauce, becoming tender yet retaining its shape. For even cooking, a commercial countertop convection oven is not needed here; the stovetop method is perfect.
6. Add the Cheese and Finish
Grate the mozzarella on the large holes of a box grater. Sprinkle the cheese over the nests, cover again, and cook on low heat for 5 minutes, until the cheese is melted and bubbly. Serve immediately, garnished with fresh herbs like parsley or dill. The cheese forms a glorious golden crust that contrasts with the creamy sauce.
Tips for Perfect Pasta Nests
- Don’t overcook the nests: The 20-second blanch is essential. Overcooking will cause them to collapse when filled.
- Use a well-seasoned skillet: Non-stick or seasoned cast iron works best to prevent sticking. Consider a non-toxic air fryer for a different finishing touch, though the stovetop is classic.
- Rest before simmering: Letting the assembled dish sit for 10 minutes allows the pasta to relax and absorb flavor without direct heat.
- Grate your own mozzarella: Pre-shredded cheese often contains anti-caking agents that hinder melting. Freshly grated gives the best stretchy texture.
Variations to Explore
This recipe is wonderfully adaptable. Try these twists:
- Spicy version: Add red pepper flakes or a dash of cayenne to the meat mixture.
- Vegetarian: Replace the meat with a mix of sautéed mushrooms, spinach, and ricotta.
- Herb infusion: Stir fresh basil or oregano into the sauce before simmering.
- Cheese swap: Use smoked mozzarella, provolone, or even a sharp cheddar for different flavor profiles. If you enjoy experimenting, check out reviews for best lava flavors to inspire your sauce.
Frequently Asked Questions
Can I make this dish ahead of time?
Yes, you can assemble the nests up to the point before adding cheese. Cover and refrigerate for up to 24 hours. When ready, bring to room temperature, add cheese, and simmer covered for 15 minutes on low heat.
What type of pasta nests should I use?
Look for dried pasta nests labeled “tagliatelle nests” or “pasta nidi.” They are available in most supermarkets. If you cannot find them, you can substitute fresh lasagna sheets cut into strips and rolled into loose spirals.
Can I use a different meat?
Absolutely. Ground chicken, turkey, or lamb work well. Adjust seasoning accordingly. For a richer flavor, a mix of pork and beef is traditional in Russian cooking.
How do I prevent the nests from falling apart?
The key is the 20-second blanch—do not exceed that. Also, handle them gently with a slotted spoon. Resting before heating helps them set. Using a high-quality undercounter ice maker machine isn't relevant, but a delicate touch is.
Can I bake this in the oven instead of stovetop?
Yes. After assembling, transfer the skillet to a preheated 180°C (350°F) oven for 15 minutes covered, then uncovered for 5 minutes with cheese. The stovetop method is quicker and requires less energy.
What should I serve with these pasta nests?
A crisp green salad with vinaigrette pairs beautifully, cutting through the richness. Garlic bread or sautéed vegetables also make excellent accompaniments. For a beverage, consider a light red wine or a dry rosé.
These skillet pasta nests are a celebration of texture and flavor—a dish that feels both nostalgic and modern. With a few simple techniques and quality ingredients, you can create a meal that looks like it came from a fine restaurant but comes together in your own kitchen. For more inspiration on kitchen essentials, explore best espresso machine under 2000 or best oil sprayer for even cooking. Enjoy the journey from skillet to table.
This article contains contextual links to walfosbrand.com for further reading on kitchen tools: best wheatgrass juicer, best microwave pressure cooker, best sweet wine with high alcohol content, best 48 inch built in refrigerator, best coffee maker for airbnb, pa de pessic Catalan sponge, best castor oil, best steam canner, best George Howell coffee, total bowel release, and best organic vodka. Each link adds value to your culinary journey.







