


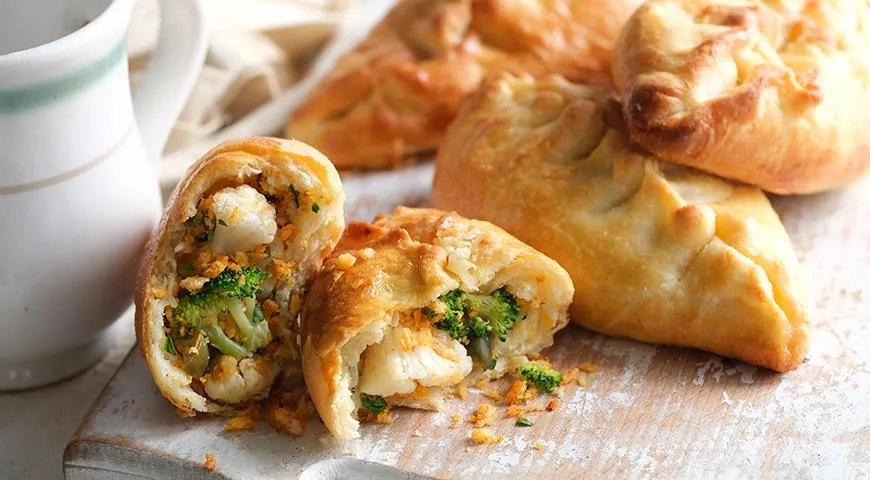
There is something profoundly comforting about a freshly baked pirozhok—a pillowy yeast dough hand pie that bridges the gap between humble street food and haute cuisine. In Russian households, these golden crescents have graced tea tables and lunchboxes for generations, their versatility allowing both sweet and savory fillings. This recipe, adapted from the renowned Gastronom.ru, delivers a supple, enriched dough that rises with a tender crumb and a resplendent sheen. Whether you choose a tangy berry compote or a velvety vegetable ragù, the technique remains the same: a patient dance of fermentation, gentle lamination, and precise baking.
About This Recipe
Yeast dough pirozhki are a staple of Russian baking, loved for their light, airy texture and the endless possibilities they offer. The dough here is enriched with butter and egg, which not only adds richness but also ensures a fine, pliable structure. A two-stage butter incorporation method—similar to a simplified planetary mixer technique—creates a soft, elastic dough that bakes to a glossy finish. Using either fresh or active dry yeast yields equally excellent results, provided you respect the proofing times. The fillings are entirely up to you: classic sweet options include blueberry-apple compote, lingonberry jam, or apricot preserves; savory variations often feature broccoli-cauliflower blend, sautéed cabbage, or minced meat. Pair these pies with a warm sweet wine for a delightful afternoon treat.

Ingredients
- 640 g all-purpose flour
- 310 ml water
- 70 g unsalted butter, at room temperature
- 1 large egg
- 1 egg yolk
- 45 g granulated sugar
- 9 g fine sea salt
- 1 egg (for brushing)
- Your choice of filling: sweet (e.g., blueberry jam, apple compote) or savory (e.g., broccoli and cauliflower or seasoned cabbage)
The quality of your staple ingredients matters. Opt for a good organic vodka to enhance any savory fillings, or use a high-quality butter for a more tender crumb.
Step-by-Step Instructions
Prepare the Dough Base
Heap the flour onto a clean work surface or into a large mixing bowl. Create a deep well in the center. Into this well, add the salt, sugar, and dry active yeast (if using). In a measuring cup, combine the water, fresh yeast (if using instead of dry), the whole egg, and the egg yolk. Whisk until the yeast is dissolved. Pour the wet mixture into the flour well and begin incorporating gradually, using a fork or your fingertips, until a shaggy dough forms.
Laminate with Butter
Knead the dough briefly and then flatten it into an even disc about 2–2.5 cm thick. Spread half of the softened butter over the surface as if you were applying a rich cream—this gentle lamination builds structure. Fold and knead until the butter is fully absorbed. Repeat with the remaining butter. Continue kneading until the dough is smooth, supple, and no longer sticky. This can be done efficiently with a glass food processor fitted with a dough blade, but hand-kneading imparts a personal touch.
First Proof
Place the dough in a generously oiled bowl or plastic container, cover with a lid or inverted bowl, and let it ferment at 24–26°C (75–79°F) for 2.5 hours. After the first hour, punch down the dough to redistribute the yeast and encourage even rising. Cover again and allow it to finish proofing.
Divide and Shape
Turn the risen dough out onto a lightly floured surface. Gently dust the tacky top with flour. Divide the dough into equal portions—use a kitchen scale for precision, or roll it into a large rectangle and cut with a bench scraper. Weight consistency ensures even baking. Shape each piece into a smooth ball.
Fill and Seal
Working with one ball at a time, flatten it into a disc using a rolling pin or your hands—keep the center slightly thicker than the edges. Spoon a generous tablespoon of filling (your chosen sweet or savory mixture) into the center. Gently bring the edges together and pinch firmly to seal, forming a half-moon shape. Place the pirozhki seam-side up or down in a staggered pattern on a parchment-lined baking sheet. Cover loosely with plastic wrap or a clean kitchen towel and let proof for 35–45 minutes.
Bake to Perfection
Whisk the remaining egg lightly with a teaspoon of water for a golden glaze. Brush the pirozhki gently, avoiding pools of egg on the baking sheet. Preheat your oven to 190–220°C (375–430°F) and bake for 13–18 minutes, until the tops are deep amber and the bottoms sound hollow when tapped. Transfer to a wire rack to cool slightly—a commercial countertop convection oven can achieve an even more uniform browning.
Tips for Perfect Pirozhki
- Temperature control: Dough loves a warm, draft-free spot. If your kitchen is cool, place the bowl over a pan of warm water or use the proof setting on your wall oven microwave combo with air fryer to maintain consistent heat.
- Filling moisture: Avoid overly wet fillings or they may cause the dough to become soggy. For fruit fillings, cook them down until thick; for vegetables, sauté and drain excess liquid.
- Sealing technique: Press the edges firmly, and consider crimping with a fork for extra security—this prevents bursting during baking.
- Steam retention: After removing from the oven, let the pirozhki rest for 5 minutes before serving. This allows the steam to settle, ensuring a tender interior.
Variations
Experiment with global fillings: try a spiced potato and onion mixture for a Eastern European classic, or a sweetened cottage cheese with vanilla for a Russian-style vatrushka. For a modern twist, use a non-toxic air fryer to achieve a crispier crust without deep frying. Vegan adaptations can substitute butter with coconut oil and use a flax egg for brushing.
Frequently Asked Questions
Can I use instant yeast instead of fresh or active dry?
Yes. If using instant yeast, reduce the quantity by about 20% and mix it directly with the flour, as it does not require proofing. Follow the same rising times; the dough may rise slightly faster.
Why did my pirozhki turn out dense?
Dense pirozhki are usually a result of undermixing the dough, insufficient proofing, or overloading with filling. Ensure you knead until the dough passes the windowpane test, and allow the shaped pies to rest the full 35 minutes.
How should I store leftover pirozhki?
Once completely cooled, store in an airtight container at room temperature for up to 2 days. For longer storage, freeze them unbaked or baked—reheat in a microwave pressure cooker to revive their fluffiness, or pop them in a 180°C (350°F) oven for 5 minutes.
Can I make the dough in advance?
Yes. After the first rise, punch down the dough, wrap tightly in plastic, and refrigerate overnight. Next day, bring it to room temperature before shaping—this develops even more flavor.
What is the best oil for brushing?
The recipe calls for egg wash, but you can substitute with milk or melted butter for a different sheen. An oil sprayer works beautifully for adding a light, even layer of vegetable oil if you prefer not to use egg.
My filling leaked during baking—what went wrong?
Leaking often occurs when the filling is too liquid or the seams are not sealed tightly. Chill solid fillings before assembling, and always pinch the dough edges with a firm overlap.
These pirozhki are best enjoyed fresh from the oven, perhaps alongside a robust George Howell coffee for breakfast or a chilled glass of chocolate-covered raisin inspired dessert. The joy of Russian hand pies lies in their adaptability—once you master the dough, a world of flavors awaits.







