


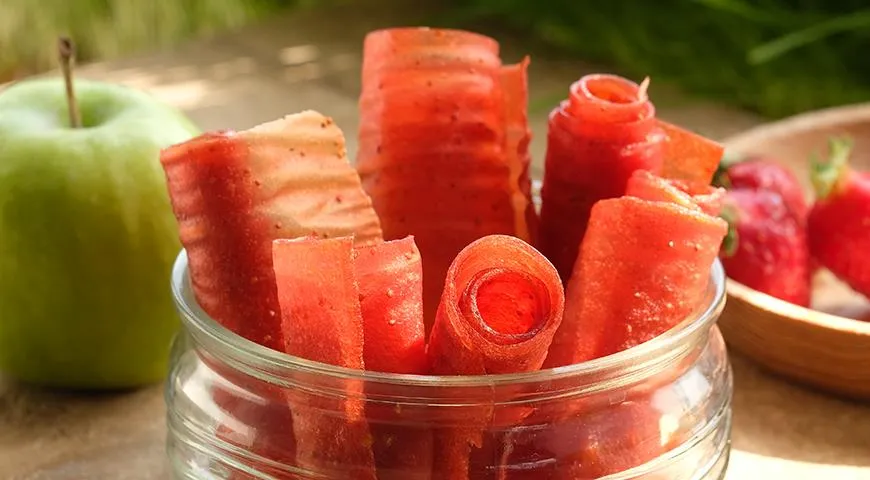
Few desserts capture the soul of a nation quite like fruit pastila. This ethereal confection, a distant cousin of fruit leather yet infinitely more refined, has been woven into the fabric of Russian culinary heritage since the 16th century. First documented in the Domostroy and in a charter from the Kirillo-Belozersky Monastery penned by Ivan the Terrible himself, pastila was born from a simple, almost ascetic philosophy: preserve the pure essence of fruit. Unlike modern gummy snacks laden with additives, authentic pastila relies on the natural pectin and acidity of apples and berries to create a delicate, melt-in-the-mouth texture. Today, we invite you to revive this ancient art. With just a handful of ingredients and a gentle hand, you can craft a jewel-like homemade pastila that tastes of sun‑ripened orchards and centuries of tradition.
About the Magic of Pastila
Pastila holds a unique place in the Russian pastry canon. It is not baked, fried, or boiled into submission; rather, it is carefully coaxed into existence through slow simmering and patient dehydration. The original recipes called for little more than apple purée, honey, and berry pulp—no eggs, no flour. The snowy white version, often enriched with egg white, appeared only later. This particular recipe stays true to the rustic roots, combining sweet apples with a tart berry medley to achieve a balanced, vibrant flavour. The result is a chewy yet tender sheet that can be rolled into elegant scrolls, snipped into ribbons, or used as a whimsical edible wrapper. Whether you serve it as a teatime treat, a lunchbox surprise, or a homemade gift, fruit pastila is a timeless showpiece of simplicity.

Ingredients
- 1.1 kg apples (any sweet‑tart variety)
- 350 g mixed berries (strawberries, blackcurrants, cherries, or a combination)
- 70 g sugar
- 1–2 tablespoons lemon juice
Note: Choose firm, ripe apples such as Granny Smith, Gala, or Fuji. The berries can be fresh or frozen; if frozen, allow them to thaw and drain slightly.
Step‑by‑Step Instructions
Step 1: Prepare the Apples
Peel and core the apples, then cut them into large chunks. Place the chunks in a heavy‑bottomed pot. Add just enough water to cover the bottom by a couple of centimetres. Cover and cook over low heat until the apples break down completely into a soft purée. This will take 20–40 minutes, depending on the apple variety. Stir occasionally and add a splash more water if needed to prevent scorching.

Step 2: Purée the Berries
While the apples cook, press the berries through a fine‑mesh sieve to remove seeds and skins. A food mill works beautifully for this, but a sturdy spoon and a sieve will also do the job. Set the smooth berry purée aside.

Step 3: Blend Fruit Mixture
Transfer the cooked apples to a blender bowl. Add the berry purée and sugar. Purée until completely smooth. If your blender is too small, you can also mash the mixture thoroughly with a potato masher until no large pieces remain. A high‑performance immersion blender, like the non‑toxic models reviewed here, makes this task effortless and ensures a silky consistency.

Step 4: Reduce the Purée
Return the fruit purée to the pot. Cook over low heat, uncovered, stirring frequently, until the mixture thickens to a marmalade‑like consistency. This reduction usually takes about 40 minutes. The goal is to evaporate excess moisture so that the pastila dries evenly. A steam canner can be used to retain even heat, but a simple heavy pot works fine.

Step 5: Adjust Sweetness
About five minutes before the purée is ready, taste it and add the lemon juice a little at a time. Remember that the final dried pastila will taste significantly sweeter, so aim for a slightly tart balance now. A citrus juicer or even a manual squeezer can help extract fresh lemon juice efficiently.

Step 6: Prepare Baking Sheets
Line baking sheets with parchment paper and brush the paper lightly with a flavourless vegetable oil. Alternatively, you can use a silicone baking mat, which needs no greasing. A fine‑mist oil sprayer ensures an even, light coating.

Step 7: Spread the Purée
Allow the reduced fruit mass to cool slightly, then spread it onto the prepared parchment in a layer about 7 mm thick. Use an offset spatula or a silicone scraper to level the surface. A planetary mixer isn’t needed here, but a good spatula is essential for an even layer.

Step 8: Dry the Pastila
Dry the pastila in an oven set to no higher than 100 °C (ideally 70–80 °C) for 3–4 hours. The exact time depends on the apple variety and how much the purée was reduced. The pastila is ready when it no longer sticks to your fingers, feels firm, and is pliable enough to bend without cracking. A non‑toxic air fryer convection oven can also be used at a low temperature, provided it has a dehydrate setting.

Step 9: Remove and Roll
Once dry, peel the pastila off the parchment. Using scissors, cut it into wide ribbons, then roll each ribbon into a tight scroll. Store the rolls in an airtight container in a cool, dry place — a built‑in refrigerator works well for long‑term storage, but a pantry keeps them for up to a month.

Tips for Perfect Pastila Every Time
- Choose the right apples: Tart, firm apples like Granny Smith or Antonovka yield the best pectin and flavour. Avoid overly sweet mealy apples.
- Don’t rush the reduction: The purée must be thick enough to hold its shape. If it’s too runny, the pastila will take forever to dry and may turn brittle.
- Use a silicone mat if possible: It eliminates the need for oil and makes removal effortless. A commercial‑grade countertop convection oven with a dehydrate function ensures even airflow.
- Test for doneness: The pastila should feel dry to the touch but still flexible. If it cracks when bent, it’s over‑dried. If it’s tacky, give it another 30 minutes.
- Experiment with flavors: A pinch of cinnamon or vanilla in the purée adds a lovely warmth. Chopped dried fruits or nuts can be sprinkled on top before drying for texture.
Variations to Explore
Pastila is endlessly adaptable. For a classic Russian white pastila, fold in one stiffly beaten egg white after the purée has cooled, then dry as directed. This yields a spongy, cloud‑like texture. Try a tropical version with mango and pineapple purée for a sunny twist. Serve the scrolls alongside a glass of sweet dessert wine for an elegant afternoon pairing. You can also layer pastila with cream cheese or jam to create a no‑bake dessert roll.
FAQ
Can I make pastila without sugar?
Yes, but the sugar helps with preservation and texture. For a sugar‑free version, replace the sugar with a little honey or agave syrup, or use very ripe fruits. The drying time may increase slightly.
Why did my pastila turn out too sticky?
It likely wasn’t dried long enough. Return it to the oven at 70 °C for another 30 minutes and check again. Also ensure your purée was sufficiently reduced before spreading.
Can I use frozen berries instead of fresh?
Absolutely. Thaw them first, then press through a sieve. The resulting purée may be slightly more watery, so cook it down a little more before adding to the apple base.
How long does homemade pastila keep?
Stored in an airtight container at room temperature away from humidity, pastila will keep for 4–6 weeks. In the refrigerator, it can last up to 3 months. Avoid freezing, as ice crystals can alter the texture.
What’s the best way to cut pastila?
Sharp kitchen scissors are ideal for clean, even ribbons. A chef’s knife also works if the pastila is laid flat on a cutting board. For decorative shapes, use cookie cutters after removing from the parchment.
Can I dry pastila without an oven?
Yes, a food dehydrator set to 55–60 °C works beautifully. You can also dry it in a warm, well‑ventilated room, though this may take 2–3 days. A microwave pressure cooker is not recommended for drying.
My pastila cracked while rolling — what went wrong?
Over‑drying is the main culprit. Next time, remove the pastila from the oven while it is still slightly pliable. If it cracks, try spritzing it very lightly with water and let it sit for 15 minutes before rolling.







