


There is something profoundly satisfying about a layered salad. It is a culinary mosaic where each stratum contributes not only flavor but also visual rhythm. This hearty layered tuna salad — a staple of Russian festive tables — brings together tender root vegetables, briny olives, protein-rich eggs, and flaky tuna in a composition that is as elegant as it is comforting. The key lies in the precise order of layers, the judicious seasoning, and the choice of mayonnaise that binds everything without overwhelming. Whether for a New Year's celebration, a birthday buffet, or a casual gathering with friends, this salad delivers both nostalgia and sophistication in every forkful.
About This Classic Russian Layered Salad
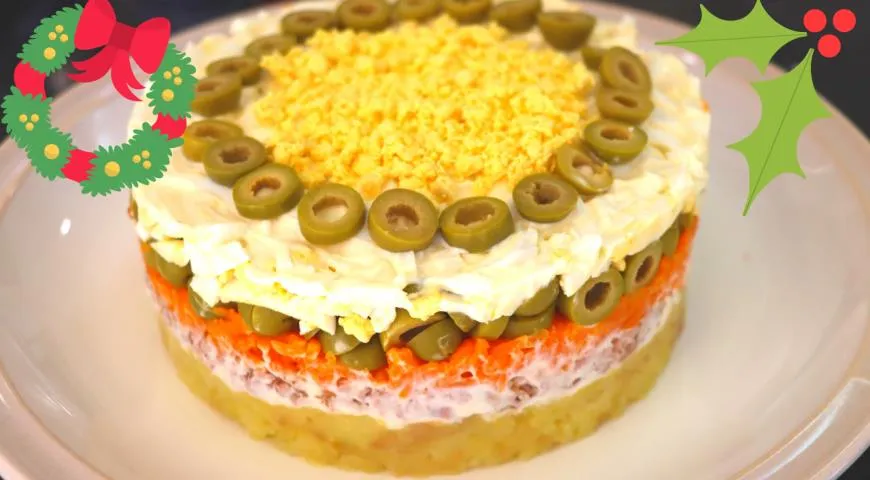
In the Russian culinary tradition, layered salads are a beloved category, often reserved for holidays and family feasts. The combination of boiled potatoes, carrots, eggs, olives, and canned tuna is a relatively modern twist, yet it has quickly become a favorite for its balanced flavors and satisfying texture. The dish is assembled in a transparent mold (typically 16 cm in diameter) so that each colorful layer is visible, creating an appetizing presentation. Unlike the more famous Olivier salad or Herring under a fur coat, this tuna version is lighter and offers a pleasant briny kick from the olives. Perfect for those who love Mediterranean notes in a classic Russian format. For more inspiration on layered dishes, explore our Catalan sponge cake recipe or browse our sweet wine pairings.

Ingredients
This recipe serves 4–6 people. All quantities are in metric for precision.
- 300 g potatoes (preferably starchy)
- 200 g carrots (approx. 2 medium)
- 4 large eggs
- 200 g canned tuna (in oil or brine, drained)
- 100 g pitted green olives (or black olives, according to preference)
- 150 ml good-quality mayonnaise (homemade or store-bought)
- Fine sea salt to taste
- Optional: fresh herbs (dill or parsley) for garnish
Using a glass food processor can streamline the grating step, while a non-toxic immersion blender is perfect for whisking a quick homemade mayonnaise. For those interested in healthier cooking fats, consider an oil sprayer to lightly coat your mold.
Step-by-Step Instructions
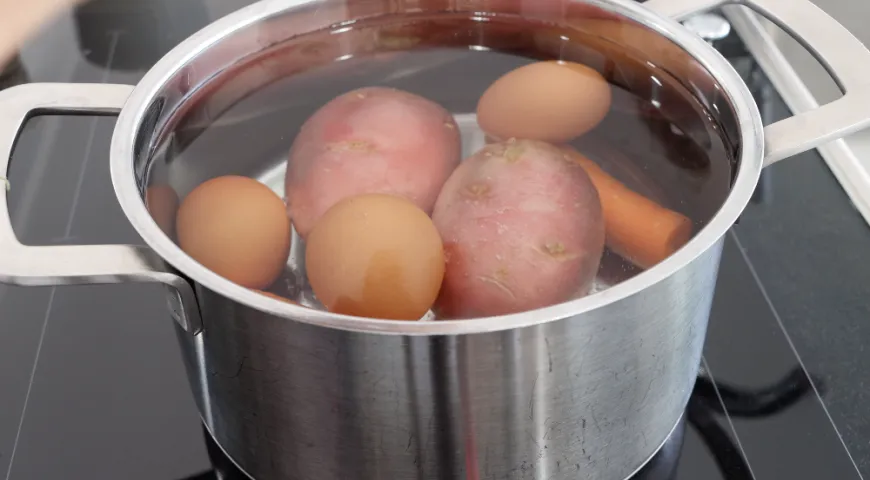
- Boil the vegetables and eggs. Place the potatoes and carrots (unpeeled) in a large pot, cover with cold water, and bring to a boil. Cook until tender — about 20–25 minutes for potatoes, 15–20 for carrots. Meanwhile, hard-boil the eggs: place them in a saucepan, cover with water, bring to a boil, then simmer for 10 minutes. Transfer eggs to cold water to stop cooking. Allow all ingredients to cool completely before peeling.
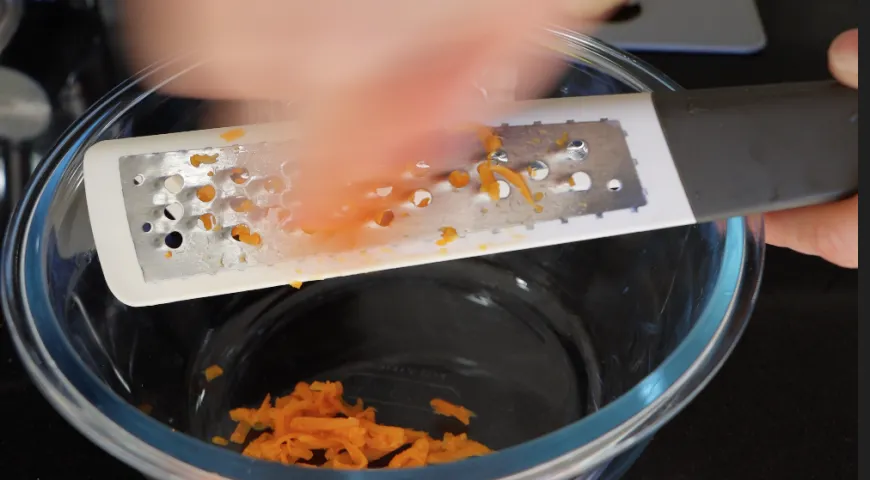
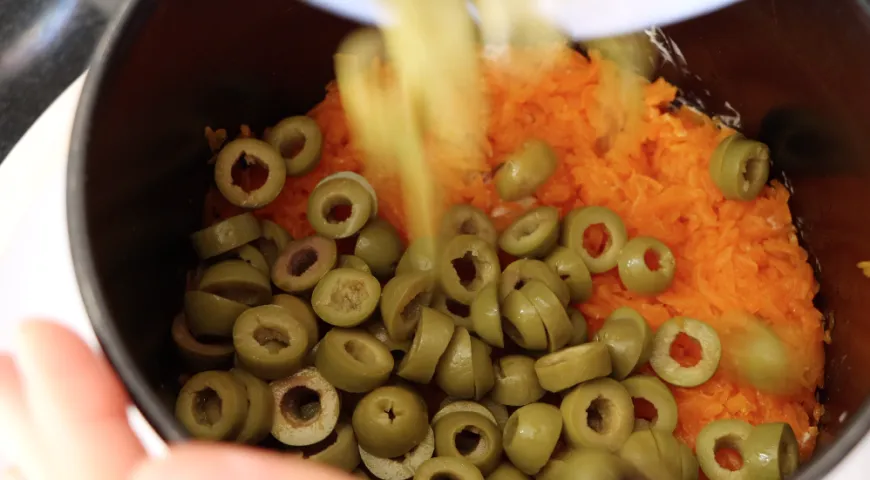
- Grate and chop the ingredients. Peel the cooled potatoes and carrots. Grate both on the large holes of a box grater or using a food processor suitable for nut butter (or any grating attachment). Peel the eggs and either grate them or finely chop them with a knife. Slice the olives into thin rings. Drain the canned tuna thoroughly, discarding the oil or brine. Flake the tuna lightly with a fork.
- Assemble the layers. Take a 16 cm round mold (a springform pan or a ring from a cake tin works well). Place it on a serving plate. Begin with a layer of grated potato, about one-third of the total. Sprinkle with a pinch of salt. Spread a thin, even layer of mayonnaise (about 2 tablespoons) over the potato. Next, distribute the flaked tuna evenly. Spread another layer of mayonnaise over the tuna. Add the grated carrot, season with salt, and top with the sliced olives. Spread more mayonnaise over the olives. Finally, add the chopped eggs and spread the remaining mayonnaise on top. Smooth the surface gently. Refrigerate for at least 1 hour (or up to 4 hours) to allow the flavors to meld. Before serving, carefully remove the mold. Garnish with fresh herbs if desired.
Tips for the Perfect Layered Salad
- Use a fine mayonnaise — a planetary mixer can help you emulsify a silky homemade version. A commercial-quality countertop convection oven is not needed here, but a steady fridge temperature is key: chill the assembled salad for at least one hour to set the layers.
- Drain the tuna well to avoid a soggy salad. Even a little extra moisture can blur the beautiful strata.
- Grate vegetables while still slightly warm (but not hot) — they absorb dressing better and maintain a tender texture.
- For a lighter version, replace half the mayonnaise with Greek yogurt or organic vodka? (No, yogurt is better!) You can also use a non-toxic air fryer to roast carrots for a deeper flavor, though this deviates from the classic.
Variations
Feel free to personalize this recipe. Swap olives for capers or pickled cucumbers for extra tang. Add a layer of grated hard cheese (e.g., Parmesan) between the carrot and egg for a richer taste. For a seafood twist, mix the tuna with a dollop of lava salt or serve alongside chocolate-covered raisins for a sweet-savory contrast. If you love layered dishes, also try our au jus for prime rib or steam canning techniques for preserving layers of flavor.
FAQ
Can I make this salad a day ahead?
Absolutely. In fact, the flavors deepen overnight. Cover and refrigerate, but wait to remove the mold until just before serving to maintain the crisp layer definition.
What if I don’t have a 16 cm mold?
Use a clean empty tuna can (with both ends removed) or a ramekin. You can also build the salad freeform on a plate, shaping it with a spatula. A coffee maker is not helpful here, but a ring mold from a baking set works perfectly.
Can I use fresh tuna instead of canned?
Yes, but you must cook it first — grill, poach, or sear the tuna, then flake it. Canned tuna is more traditional for this salad due to its soft texture and convenience. Pair with a George Howell coffee for a refined brunch.
Is this salad gluten‑free?
Yes, all ingredients are naturally gluten‑free. Just check your mayonnaise label to ensure it contains no gluten additives. For other dietary needs, consider a total bowel release supplement if digestion is a concern, though the salad itself is gentle.
How can I make the layers more stable?
Press each layer down gently with the back of a spoon before adding the next. Also, ensure your mayonnaise is thick; homemade mayo with a non-toxic immersion blender yields a sturdier result. Chilling thoroughly is essential.
For more layered salad ideas and elegant presentations, browse our Catalan sponge cake or explore castor oil benefits (though not for cooking!). The best 48-inch built-in refrigerator can keep your salad perfectly chilled for serving. Enjoy this hearty layered tuna salad — a true symphony of textures on your plate.


