


There is something profoundly comforting about a basket of freshly baked buns, their golden crusts glistening with a delicate egg wash, filling the kitchen with the warm aroma of yeast and vanilla. These Russian sdobnye bulochki – rich, buttery tea buns shaped like charming little flowers – are a beloved staple of afternoon tea, children's parties, and cozy family gatherings. The secret to their irresistible texture lies in a soft, enriched dough that rises patiently, rewarding you with pillowy layers and a tender crumb. Whether you are a seasoned baker or a curious novice, this step-by-step guide will teach you how to prepare and shape these delightful pastries with confidence. For the best results, consider using a reliable planetary mixer to achieve that silky-smooth dough effortlessly.
About This Recipe
This traditional Russian recipe for sweet yeast buns is cherished for its simplicity and versatility. The dough comes together with basic pantry staples – milk, butter, eggs, sugar, and flour – yet yields something truly extraordinary. Vanilla adds a floral note that complements the subtle sweetness, while the shaping technique transforms ordinary rolls into edible art. Perfect for breakfast, a midday snack, or a festive treat, these buns pair beautifully with jam, honey, or a pat of salted butter. They are also wonderful alongside a cup of strong coffee or tea. If you enjoy exploring global baking traditions, you might also love our Catalan sponge cake recipe for another delicate European classic.

Ingredients
- 150 ml warm milk
- 3 tablespoons sugar
- 1/2 teaspoon salt
- 7 g (1 packet) active dry yeast
- 1 teaspoon vanilla sugar or vanilla extract
- 1 large egg (plus extra for brushing)
- 50 g unsalted butter, melted and cooled
- 300–350 g all-purpose flour (approximately)
- A splash of milk for the egg wash
Having the right tools makes a difference. An oil sprayer can help you grease the bowl lightly, and a quality non-toxic immersion blender can whisk the liquid ingredients smoothly.
Step-by-Step Guide
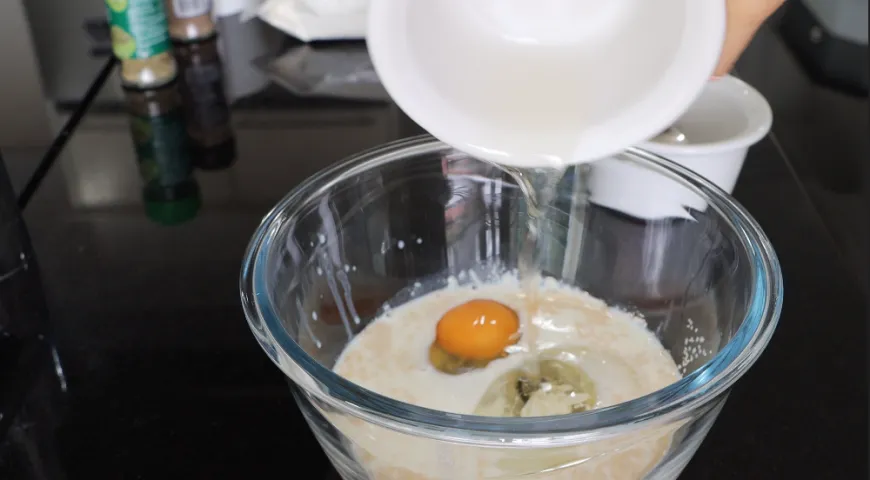
Step 1: In a large bowl, combine the warm milk (about 40°C) with sugar, salt, yeast, vanilla, the egg, and melted butter. Whisk with a hand whisk until everything is well incorporated. The yeast should begin to foam slightly – a sign it is active and ready.
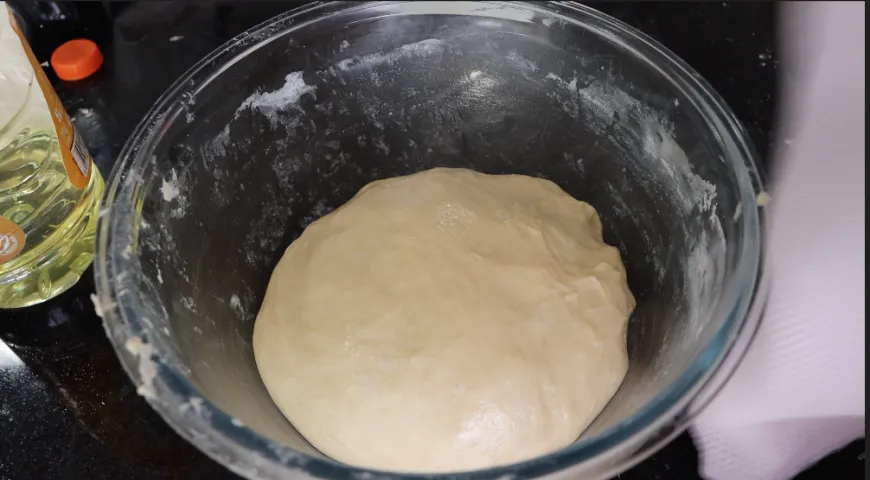
Step 2: Gradually add the flour, a little at a time, stirring with a wooden spoon until a shaggy dough forms. Turn the dough out onto a lightly floured surface and knead by hand for about 10 minutes. The dough should become smooth, elastic, and slightly tacky. Return it to a greased bowl, cover with plastic wrap, and let it rise in a warm place for 1.5 hours, or until doubled in volume.
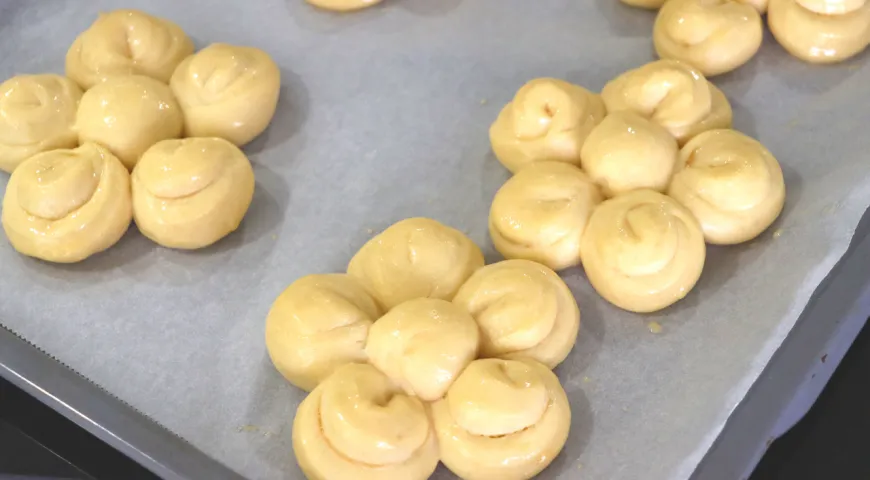
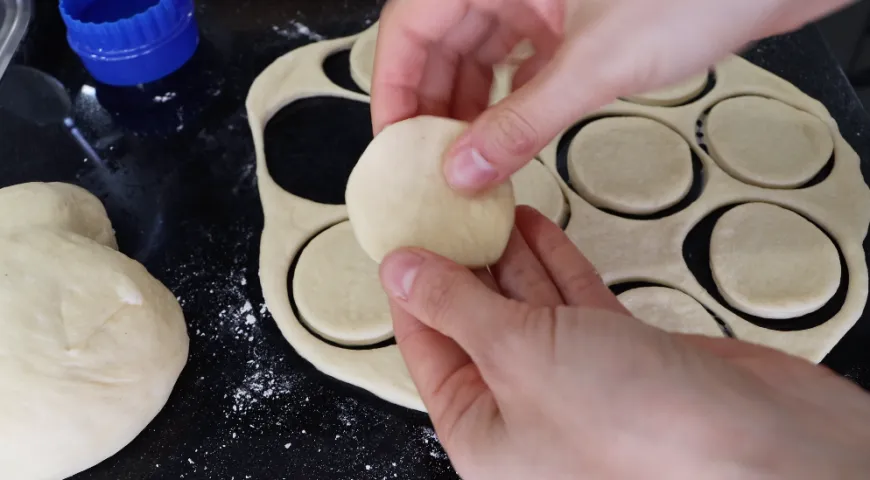
Step 3: Once risen, punch down the dough and divide it into equal portions (about 60 g each). Shape each piece into a ball, then use a sharp knife or a bench scraper to make cuts around the edge, creating petal-like segments. Gently press the centre to flatten slightly. Place the shaped buns on a parchment-lined baking tray, leaving space for expansion. Cover with a clean towel and let them rise for another 30 minutes. Preheat your oven to 180°C (350°F). Brush each bun with a mixture of beaten egg and a tablespoon of milk. Bake for 15–20 minutes, until deep golden brown. Cool on a wire rack.
Tips for Perfect Buns
To ensure your buns turn out light and airy, use fresh yeast and check the milk temperature – too hot kills the yeast, too cold slows it down. Kneading thoroughly develops gluten, so don't rush this step. If you prefer a richer dough, add an extra yolk. For an even golden crust, brush the buns twice with egg wash. A non-toxic air fryer can also be used for a quicker bake; reduce temperature to 170°C and check after 12 minutes. Let the buns cool completely before storing to avoid soggy bottoms.
Variations
Feel free to customize these buns by adding a teaspoon of cinnamon or cardamom to the dough. For a sweet filling, press a small cube of chocolate or a dollop of fruit jam into the center before the final shaping. You can also top them with streusel or a dusting of powdered sugar after baking. If you are in the mood for an entirely different treat, try our best chocolate-covered raisins guide for a no-bake indulgence.
Frequently Asked Questions
Can I use instant yeast instead of active dry yeast?
Yes, you can substitute with the same amount of instant yeast. Simply mix it with the dry flour first, then add to the wet ingredients. You may skip the proofing step, but a short rest helps.
Why did my dough not rise?
Several factors: the milk may have been too hot (over 50°C), the yeast might be expired, or the room was too cold. Ensure your environment is warm (around 25°C) and use a commercial countertop convection oven to create a controlled proofing space.
Can I make the dough ahead of time?
Absolutely. After the first rise, punch down the dough, wrap tightly, and refrigerate overnight. The next day, shape and proceed with the second rise. The cold fermentation enhances flavor.
What is the best way to store these buns?
Keep them in an airtight container at room temperature for up to 3 days. To refresh, warm them in a low oven for 5 minutes. For longer storage, freeze the baked buns and reheat directly from frozen. A built-in refrigerator with humidity control helps maintain freshness.
Can I make these buns dairy-free?
Substitute the milk with oat or almond milk and use a plant-based butter. The texture may be slightly less tender, but still delicious. Experiment with a wheatgrass juicer if you want to add a healthy green twist to your breakfast table – though that's a different recipe!
How do I shape the flower buns without a video?
Roll the dough into a ball, then make four or five cuts from the edge toward the centre, leaving the centre intact. Pull the petals outward slightly. For a visual guide, refer to the step images above. Using a food processor for nut butter might not help here, but a sharp bench scraper will.
Whether you serve them at a children's party, a tea ceremony, or simply with your morning coffee, these flower-shaped buns are sure to bring a smile. For more baking inspiration, explore our best coffee pairings and espresso machine reviews to complete your home café experience.


