


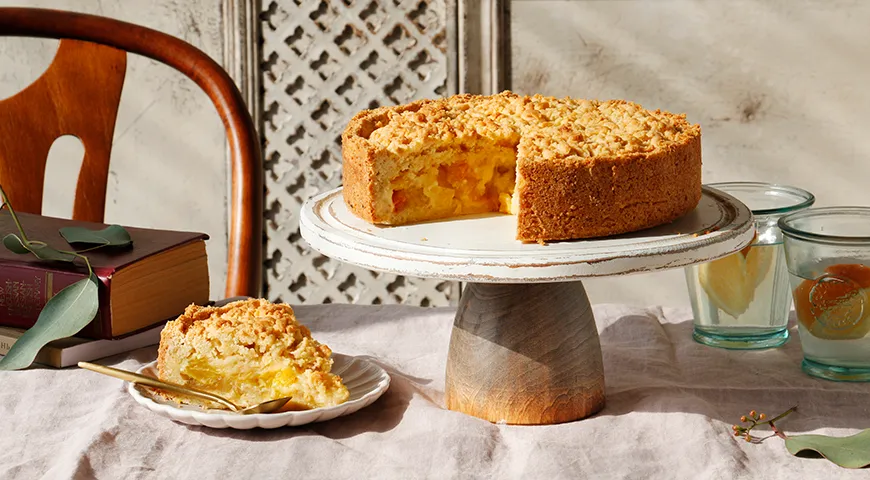
There are desserts that whisper of nostalgia—the kind your grandmother pulled from a worn recipe box, the scent of butter and citrus drifting through the kitchen. This Grated Orange Pie (Тертый пирог с апельсинами) is precisely that: a rustic, eminently adaptable Russian tart that marries a tender shortcrust base with a bright, slightly bitter orange filling and a crunchy, grated topping. It is a canvas for creativity, equally comfortable hosting a shower of toasted nuts or a cloud of meringue. At its heart, however, it remains a study in contrasts: buttery and tart, soft and crisp, simple yet utterly refined.
About the Recipe
In Russian home baking, "grated pie" refers to a method where part of the dough is frozen and then coarsely grated over the fruit filling, creating a decorative, crumbly crust. This particular version stars oranges—their zest and flesh transformed into a jammy layer that cuts through the richness of the butter dough. The technique is forgiving: you can substitute apples, pears, or stone fruits, but the orange’s natural pectin and bittersweet edge make it a standout. For a deeper dive into food processors that can quickly pulse your dough, or to ensure your oven is performing at its best, check our guide on the best wall oven microwave combos with air fryer.

Ingredients
- 300 g all-purpose flour
- 1½ tsp baking powder
- 120 g granulated sugar (for dough)
- 150 g cold unsalted butter, cut into small cubes
- 2 large eggs
- For the filling: 3 medium oranges
- 30 g cornstarch (or potato starch)
- 80 g granulated sugar (for filling)
- A pinch of salt
All ingredients should be at room temperature except the butter, which must be straight from the refrigerator. For a flawless crumb, use a planetary mixer or a glass food processor to cut the butter into the flour.
Step-by-Step Instructions
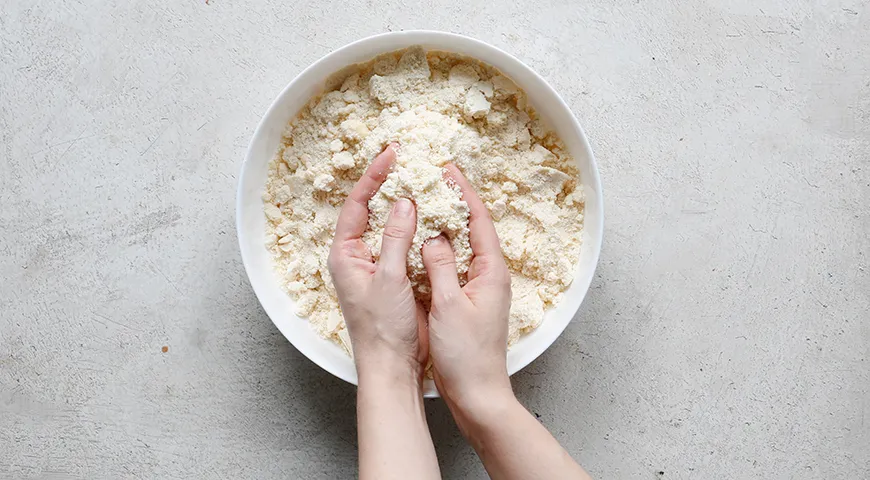
Step 1: Make the crumb base. In a large bowl, whisk together the flour, baking powder, and sugar. Add the cold butter cubes and, using your fingertips or a pastry blender, rub the mixture until it resembles coarse breadcrumbs. The butter must remain cold—if it warms, the crumb will not form properly. Transfer half of this crumb to a separate bowl and set aside for the topping.
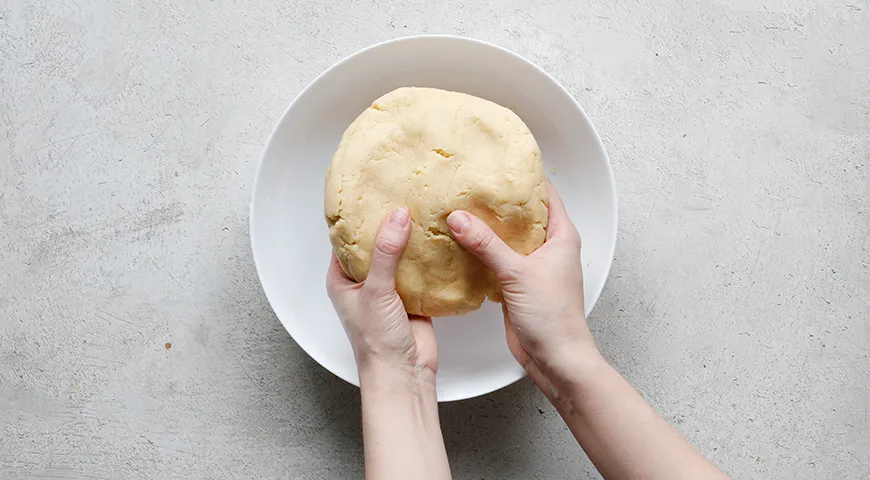
Step 2: Add the eggs. In a small bowl, beat the eggs with a fork, then pour them into the larger portion of the crumb mixture. Using a fork or a knife, stir until the dough just comes together into a shaggy mass. Do not overwork. Shape the dough into a disc, wrap in plastic, and refrigerate for 30 minutes.
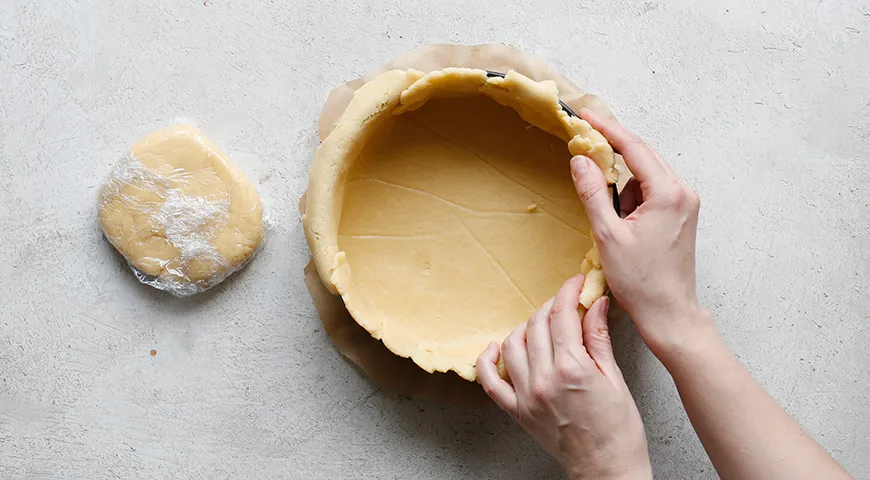
Step 3: Divide and chill. Divide the dough into two portions: two-thirds and one-third. Wrap the smaller portion tightly in plastic and place it in the freezer for at least 1 hour. Press the larger portion into an even layer on the bottom and up the sides of a 22 cm (9-inch) tart or pie pan. Prick the base with a fork and refrigerate for 1 hour.
Step 4: Prepare the orange filling. Preheat the oven to 180°C (350°F). Place the oranges in a heatproof bowl and cover with boiling water for 3 minutes. This step removes the natural bitterness from the peel (though some enjoy that edge). Drain, then cut each orange into 6 wedges, and each wedge into small pieces. In a separate bowl, toss the orange pieces with cornstarch and sugar. Important: Mix the filling just before spreading it onto the dough—if left to sit, the sugar will draw out juice and make the filling runny. For a more efficient prep, a wheatgrass juicer can extract pure orange juice for other uses, but here we want the chunky texture.
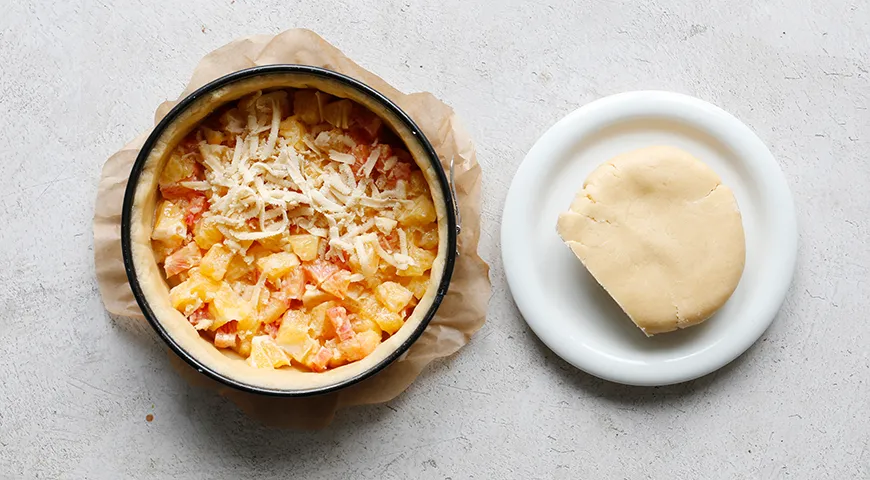
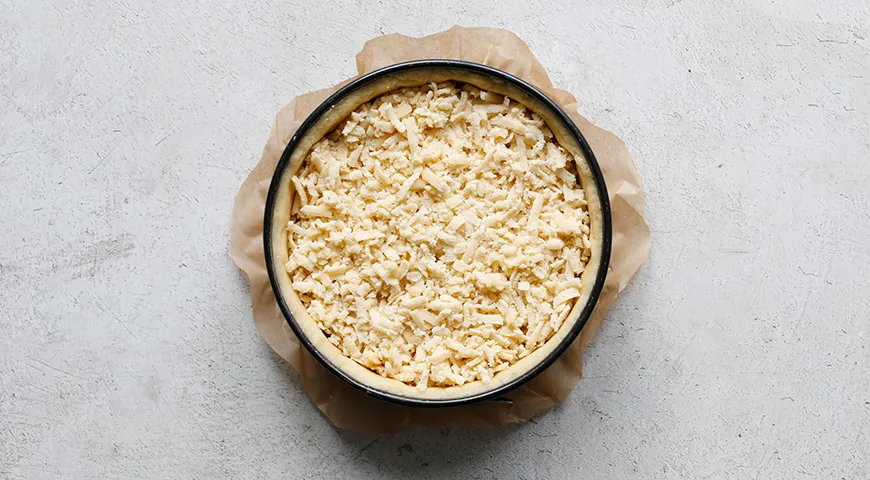
Step 5: Assemble and bake. Spread the orange filling evenly over the chilled dough base. Retrieve the frozen dough portion and coarsely grate it directly over the filling using the large holes of a box grater. The frozen dough will produce beautiful, separate shards that bake into a golden, crunchy topping. Bake for 60 minutes, until the crust is deep golden and the filling bubbles at the edges. Let cool completely before slicing—this allows the filling to set. For even baking, consider using a commercial countertop convection oven for superior heat circulation.
Tips for Perfect Texture
- Keep everything cold: If your hands warm the butter, the crumb will turn greasy. Chill the bowl and utensils if necessary.
- Grate the topping while still frozen: The dough should be rock-hard—if it softens, return it to the freezer for 15 minutes. A 48-inch built-in refrigerator with precise temperature control can help maintain that ideal chill.
- Blanch the oranges: This step is crucial if you use the peel. For a milder bitterness, skip the blanching and use only the flesh.
- Let it rest: The pie needs at least 2 hours to cool and set; overnight is even better. Use a steam canner to store leftover slices with a tight seal.
Variations to Explore
This recipe is a true Catalan sponge-style base—but instead of sponge, you have a buttery crust. Try swapping half the oranges for blood oranges or clementines. Add a handful of chopped walnuts or slivered almonds to the grated topping before baking. For a decadent finish, once the pie has cooled, pipe a layer of Italian meringue over the top and use a culinary torch to toast it. If you’re feeling adventurous, fold a teaspoon of castor oil into the dough—it adds an ultra-tender crumb.
Frequently Asked Questions
Can I use store-bought pie dough?
Yes, but the texture will be more uniform and less crumbly. For a truly rustic grated pie, homemade shortcrust is best. If time is short, a microwave pressure cooker can speed up the orange blanching step.
Why did my filling turn runny?
Likely because the sugar and orange sat too long before baking. Always mix the filling immediately before spreading. Also, ensure you use a starch—cornstarch works well. If you have a high-end espresso machine nearby, you can use the steam wand to warm the oranges slightly without extracting extra juice.
Can I freeze the baked pie?
Absolutely. Wrap the cooled pie tightly in plastic and then foil, and freeze for up to 3 months. Thaw overnight in the refrigerator. To re-crisp the topping, place in a 180°C oven for 10 minutes. A non-toxic air fryer works wonders for reheating single slices.
What if I don’t have a box grater for the topping?
You can crumble the frozen dough with your fingers or chop it with a sharp knife. Alternatively, use a food processor with a grating disc—just work quickly so the dough doesn’t warm up.
Can I make this gluten-free?
Yes, substitute the all-purpose flour with a gluten-free blend that includes xanthan gum. The crumb will be more delicate, so handle with care. A undercounter ice maker can keep the butter cold during mixing.
This Grated Orange Pie is more than a dessert; it is an invitation to play with textures and flavors. Whether you serve it with a dollop of crème fraîche or a dusting of powdered sugar, each bite carries the warmth of a Russian kitchen and the bright clarity of citrus. For another inspired variation, explore our recipe for chocolate-covered raisins—a sweet contrast to the tangy orange.


