


From an entrepreneurial perspective, the Easter bunny is one of the biggest CEOs of the seasonal calendar. Besides being cute, it delivers chocolate (and who doesn't love that?). Easter, on the other hand, is the Easter egg hunt of the business world, with hidden opportunities for those who want to combine joy, flavor, and profit. You don't need a huge investment, but you do need a strategic one. Below, check out tips that will help you climb out of the rabbit hole and into the action plan.
Kitchen utensils you need to have in your kitchen.
In a quick search, you'll find many pastry chefs who practically have a chocolate factory in their kitchen – machines for rolling brigadeiros, spatulas for this and that, four different types of thermometers, expensive bowls… however, not everything that glitters is profitable. It's no use grabbing a shopping cart and going on a shopping spree like Willy Wonka. Let's take it slow, prioritizing utensils that can be used in various productions:

Chocolate melting bowl
You will need a bowl to melt chocolate. Among the most popular options are glass, plastic, and aluminum bowls. Almost everyone has a glass container at home – if that's your case, you'll save money and won't need to buy one. One advantage is that this material can go in the microwave and be used in a double boiler. However, care must be taken when handling it, as glass retains heat on its exterior, increasing the chances of accidents.
Another point worth noting: glass transfers heat to chocolate quickly. This can burn the sugar in the chocolate and interfere with the crystallization process during cooling. Therefore, if you use a glass container to melt chocolate, immediately transfer it to another bowl, thus interrupting the heat transfer process.
We recommend using a polypropylene plastic melting pot. Caution: not just any plastic will do, as the utensil is microwave-safe and can be used in a double boiler. They are quite affordable, costing between R$10 and R$30, and you can find excellent products. One advantage is that the heat distribution is more even, speeding up the production process and preventing the chocolate from burning or the container from getting too hot.
Advertising
Choose a medium-sized container with a capacity between 1 and 2 liters, keeping in mind that very large bowls won't fit in the microwave. Also, opt for a melting pot with a spout at the end – this design makes it easier to transfer the melted chocolate into the molds.
An aluminum melting pot is a good option for those who work with large-scale production, for example, needing to melt 5 kg of chocolate at once. It requires a much higher investment, which can exceed R$ 500, and should not be microwaved. It's a good long-term investment, especially if you work with chocolate year-round; however, for those just starting out, it's best to leave this utensil out for now.
Silicone spatulas
It's rare to find someone who doesn't have a silicone spatula in their cupboard drawer. This utensil, which has gained considerable popularity in everyday cooking, is a favorite in pastry shops. Besides being easy to clean, it's durable, can be used at high temperatures, is affordable (starting at R$10), doesn't scratch non-stick surfaces, and helps to get 100% out of the recipe because it scrapes the bowl well.
If you have a plastic spatula or spoon at home, you can use it. However, it's not the best option to buy. Regular plastic tends to be less resistant than silicone and, at high temperatures (for example, when the brigadeiro is almost ready), it can start to melt. Industrial plastic offers excellent heat resistance, but it is harder to find.
We do not recommend using wooden spoons. In commercial settings, such as bars, restaurants, bakeries, etc., the use of this utensil is prohibited by the National Health Surveillance Agency (Anvisa). Wood increases the chances of accumulation of dirt and microorganisms harmful to health, begins to rot over time, can splinter during chocolate preparation, and is more difficult to sanitize.
Advertising
Have at least one silicone spatula. You can also use a silicone spoon, but its concave shape can hinder some processes, while the flat base of a spatula is more efficient. Additionally, a silicone whisk is useful for recipes that require air incorporation. In short, it's worth investing in this trio.
Chocolate molds
Here, we enter an endless universe of Easter – chocolate molds! There are options you wouldn't even imagine exist, from traditional molds for eggs, chocolates, and bars, to molds with textures and designs of all kinds (bunny, carrot, sheep, dinosaur, heart, etc.).
Although the price of the molds isn't prohibitive, it's wise to make a careful selection. Otherwise, you'll end up with a bunch of useless molds at home, or worse, you'll produce very specific products that won't reach the general public, resulting in difficulty selling them.
Advertising
It's important to know that there are two main types of molds: acetate and silicone. Acetate molds are so inexpensive that they're almost attractive (for R$2 you can buy a medium-sized Easter egg mold). However, they are less durable, break very easily, lose their shape quickly, and are more difficult to unmold – there's a chance the chocolate will break.
On the other hand, the acetate mold is a good option for those who are only going to make 1 or 2 eggs, that is, homemade production to give as gifts or for personal consumption. It also helps a lot in making minimalist decorative details and embellishments, such as chocolate bunnies and carrots.
For entrepreneurship, whether producing eggs or chocolates, silicone molds are the best option. They require a larger investment (on average, with R$15 you can buy a mold for a 150-gram Easter egg), but they are more durable and easier to handle, reducing the chances of the chocolate breaking.
Another advantage is that the silicone mold for eggs (the most commonly used) comes in 3 parts: the first, an acetate mold with markings indicating how far you should put the chocolate; the second, a silicone film that is fitted over the chocolate, ensuring a uniform shape; and the third, also made of acetate but without markings, placed on top of the silicone film to ensure good adhesion of the chocolate.
Advertising
When choosing the size and shape of your molds, consider your sales goals. For those starting a business, a safe option with high market demand is the medium-sized egg, between 250 and 300 grams. However, it's also important to have other mold sizes, small and large, especially to fulfill custom orders.
With one mold, it's possible to make an Easter egg: first, you make one half of the shell, wait for the chocolate to crystallize (harden), unmold it, and then make the other half. However, this slightly delays the production process. If possible, have at least one pair of molds for each egg size.
Chocolate candy and chocolate bar molds are also great purchases, with good market demand. If you take good care of them, they last a long time (we've had molds that easily lasted two Easters). When washing, use a soft sponge, neutral soap, and room temperature water. As you feel the need and demand arises, buy other mold models and increase your production possibilities.
Scales and tools that facilitate production.
"Ah, but I don't need measurements, I'll just eyeball it!" This kind of thinking is one of the main mistakes in Easter egg production. Leave the experimentation for the creative process of developing new fillings, eggshells, chocolates, etc. (and always write everything down). To sell them, you do need both a recipe and a scale.
With a kitchen scale, you have control over the quantities, avoiding the waste of melted chocolate or having some eggs with more filling than others, which can cause both financial losses and customer dissatisfaction. There is also the risk of the filling becoming too hard or too soft.
If you're going to temper chocolate (we'll talk about that later), a cooking thermometer is indispensable – the temperature must be in accordance with the recipe. There are two types: the manual digital thermometer, which needs to come into contact with the chocolate and takes a little longer to get a result; and the digital infrared thermometer, which is more expensive but offers a faster result and doesn't require contact with the chocolate.
A great tool for decorating and finishing Easter eggs, as well as cupcakes, is the piping bag. There are disposable and reusable options. For those who don't have much experience, we recommend the disposable one, as it's easier to handle. Of course, you'll also need a basic piping tip kit – any brand or size will fit any piping bag.
Take advantage of this opportunity and buy a box of oven mitts (nitrile gloves are the most recommended). They prevent fingerprints from appearing on Easter eggs and chocolate shells during handling. They are also very helpful when rolling brigadeiro (Brazilian chocolate fudge balls), ensuring that the sweet retains its shine. Remember: after use, the glove should be discarded, even if you are going to work with another ingredient; for example, never handle chocolate shells with the same glove you used to roll brigadeiro.
Easter Packaging
Packaging is the first impression your product leaves on the customer. It should be inviting and showcase your work. Furthermore, it helps protect the chocolate, acting as a thermal protector. Chocolate shells should be wrapped in aluminum foil or lead – we recommend lead, as it has a more attractive look and a wide variety of colors.
If you want, you can buy special stands to support the Easter egg and keep it upright. It's a good option if you're finishing the wrapping with colored paper, so it won't be visible.
An affordable – and widely used – packaging option is transparent cellophane (in this case, don't use a stand, as the result won't be visually appealing and the Easter egg will lose some of its charm). Simply wrap the egg (already wrapped in foil) in a square piece of cellophane (large enough to create the characteristic look of a traditional Easter egg). Then, finish with a pretty bow or ribbons.
Boxes made from sustainable materials are also trending and help to spread a visual identity. Although there's no rule, minimalist packaging tends to be the most sought after by adults. For children, themed designs, such as bunnies and carrots, are popular. Don't forget to put a tag/label with your brand on each product.
Embora a embalagem agregue valor ao produto, cuidado para não gastar exageradamente com isso, pois pode interferir em seu lucro. Nossa dica para quem está começando: menos é mais! Foque no simples e personalize com elementos de sua marca.
Escolha do chocolate: qual é a melhor opção?
Por último, porém a matéria-prima da produção – não dá para pensar em Páscoa sem pensar em chocolate. Entretanto, qual produto escolher? Há duas principais opções no mercado – o chocolate nobre e a cobertura fracionada.
Antes de qualquer coisa, é preciso entender a diferença entre eles, que está relacionada à proporção de cacau presente em cada um. Se o chocolate possui 25%, ou mais, de massa e/ou manteiga de cacau, ele é considerado nobre. Caso tenha uma quantidade de cacau abaixo da porcentagem informada, combinada com outra gordura vegetal, é uma cobertura fracionada.
Por possuir mais cacau, o chocolate nobre oferece uma textura macia, sabor acentuado e derrete na boca facilmente. Para trabalhar com ele, você precisa fazer a temperagem – processo de aquecer e resfriar o chocolate – em uma temperatura correta. Isso dificulta bastante o processo de produção. É mais difícil de manusear e demora mais para cristalizar.
Então, sim, você pode trabalhar com o chocolate nobre, porém ele não é a opção mais prática, principalmente para quem está começando. É preciso um conhecimento prévio em confeitaria e habilidades técnicas para manipular o chocolate, caso contrário, o resultado não ficará bom, resultando em ovos opacos ou macios demais, que derretem a qualquer temperatura ou toque.
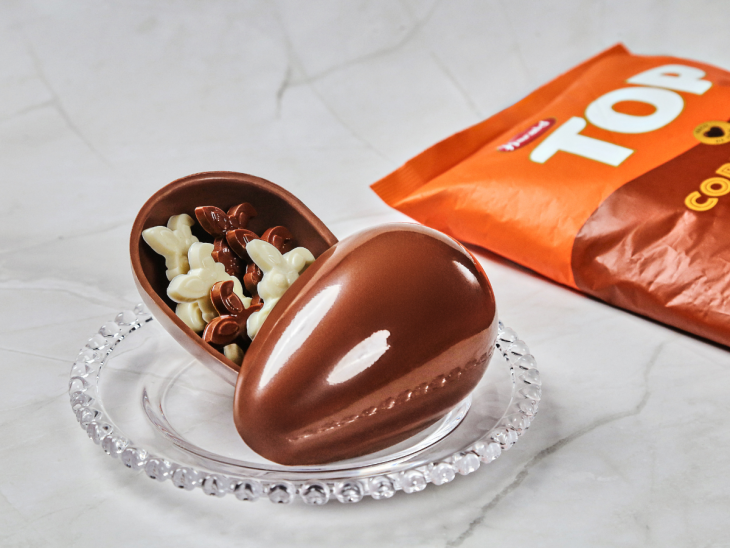
É aí que a cobertura fracionada entra na história – a queridinha das confeitarias e a preferida para a temporada de Páscoa. Essa cobertura é um doce com sabor de chocolate (também há outros sabores, por exemplo, caramelo). Ela não precisa de temperagem, é fácil de usar, oferece uma textura mais aveludada que o chocolate nobre e cristaliza mais rápido.
Você pode usar a cobertura fracionada para banhar doces em geral, biscoitos, pirulitos e frutas. É uma ótima opção para fazer cascas de ovos de Páscoa e de bombons, assim como para preparar recheios. Por ser mais resistente ao calor, facilita a produção em larga escala. Mesmo em ambientes mais quentes, é possível preparar várias cascas de ovos com antecipação e armazenar para vender na Páscoa, sem correr o risco do chocolate derreter ou perder a qualidade. Além disso, o custo-benefício é bastante atrativo – você consegue vender seu produto por um preço mais acessível, atraindo, assim, uma maior clientela.
Entretanto, não esqueça que é o seu nome em jogo. Não adianta vender um ovo de Páscoa barato e, depois, o cliente sair espalhando por aí que o seu chocolate é ruim. Para quem vai trabalhar com coberturas fracionadas, nossa dica é escolher um produto de qualidade.
The coating needs to be flavorful, offer a smooth texture, melt smoothly, and have a glossy finish – discover Harald's TOP line of coatings. We tried several flavors, testing them on eggs, chocolates, and fillings. Both the culinary experts who worked with the product and the people who ate the finished treats approved. It has our seal of approval!
With the necessary materials in hand, it's time to start getting organized, stocking up on chocolate, defining your menu, and outlining your strategies. For this, you need Easter sales management – come learn about it.
Best Recipes I Love Making at Home
:max_bytes(150000):strip_icc()/Simply-Recipes-Unstuffed-Peppers-LEAD-4-eaeaba3e3e914f428b747104600624b5.jpg)
Cooking homemade meals is one of my favorite ways to enjoy fresh ingredients, save money, and create comforting dishes packed with flavor. From hearty dinners to festive desserts and soft homemade cakes, these easy recipes are perfect for busy weeknights, family gatherings, and special celebrations. I always keep a mix of savory classics and sweet baked treats ready for every occasion.
Easy Chicken and Comfort Food Recipes
When I want simple and satisfying meals, I often prepare recipes from my favorite chicken recipes collection. Some of my go-to dishes include flavorful garlic chicken recipes, rich grandma sauce chicken, homemade chicken shawarma, and authentic homemade doner kebab. I also enjoy making comforting dishes like minced meat soup, stir-fried rice with vegetables, and traditional pepitoria chicken.
Favorite Homemade Desserts and Cakes
For desserts, I love browsing seasonal Christmas dessert recipes and soft homemade cakes from my favorite cake and biscuit recipes. Some standout treats include fluffy chocolate cake, profiteroles with fillings, Italian-style panna cotta, and crepes with Suzette sauce. I also regularly bake homemade apple cake, banana chocolate orange cake, gluten-free lemon yogurt cake, and classic Christmas Yule Log cake.
For even more kitchen inspiration, I also recommend trying this best brine for pork chops recipe to elevate homemade comfort meals with restaurant-quality flavor.


