


In the pantheon of Eastern European desserts, few evoke nostalgia quite like the Polish Pine Cone Pastry—Ciastka Szyszki or Pirożne Szyszki. This no-bake confection, beloved in Poland since the Soviet era, delivers the same crumbly, buttery satisfaction as the legendary Catalan sponge cake but without ever turning on the oven. Think of it as a quicker, more rustic cousin of the classic Muravyeinik (Anthill) cake—a jumble of crushed cookies bound with a delicate cream, then shaped into whimsical pine cones. Perfect for holiday tables, children's parties, or an impromptu sweet craving, these pastries prove that the best things in life often require minimal effort.
About Polish Pine Cone Pastries
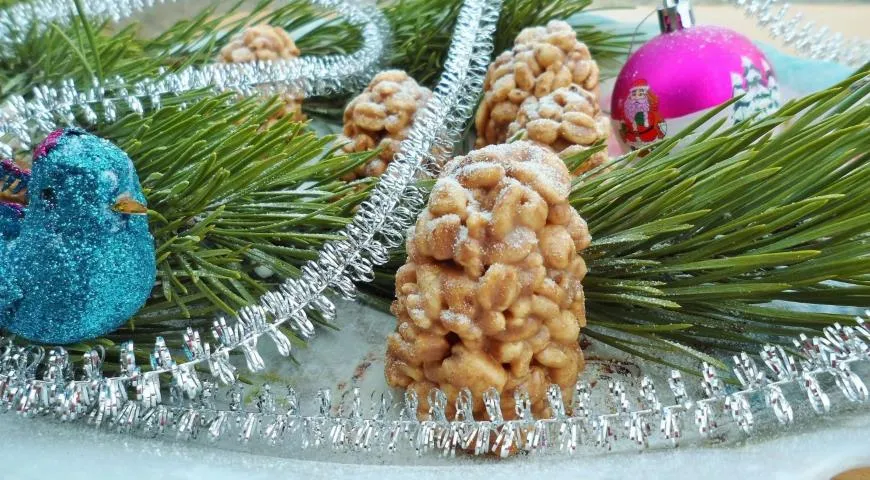
These no-bake goodies originated in Poland during the mid-20th century, when home bakers sought creative ways to use pantry staples without relying on scarce ingredients. The result was a resourceful dessert that uses simple components—butter, condensed milk, and plain cookies—to create something unexpectedly elegant. The name Szyszki (pine cones) comes from the conical shape formed by pressing the mixture into a tall glass, then dusting with powdered sugar to mimic the snowy tips of forest cones. In Russia and other post-Soviet countries, the same concept is known as Shishki, a beloved treat that pairs beautifully with strong coffee or tea. For an equally comforting drink, consider pairing them with George Howell coffee for a sophisticated finish.

Ingredients
The magic lies in the simplicity of the ingredients, each playing a vital role in texture and flavor:
- 200 g unsalted butter – softened to room temperature for easy blending. For the creamiest result, use a high-quality European-style butter.
- 200 g sweetened condensed milk – adds luscious sweetness and binds the crumb mixture.
- 300 g plain cookies (e.g., Marie biscuits or digestive biscuits) – crushed into fine crumbs. A glass food processor makes quick work of this step.
- 2 tbsp unsweetened cocoa powder (optional) – for a chocolatey twist.
- Powdered sugar – for dusting the finished pastries.
Step-by-Step Instructions
Follow these easy steps to create picture-perfect pine cone pastries:
Step 1: Soften the butter. Remove the butter from the refrigerator at least an hour before starting. It should be soft enough to leave an impression when pressed with a finger. Using a planetary mixer will ensure a silky-smooth cream.
Step 2: Mix the base. In a large bowl, combine the softened butter with the condensed milk and cocoa powder (if using). Beat until homogeneous. Gradually add the crushed cookie crumbs and mix thoroughly with a spatula or your hands until a cohesive dough forms. The mixture should be moist but not sticky—adjust with a few extra crumbs if needed.
Step 3: Shape the pine cones. Lightly wet a tall glass or small ramekin with water. Firmly pack the mixture into the glass, pressing down with the back of a spoon. Invert the glass onto a serving plate and gently tap the sides to release the cone. Repeat for the remaining mixture. For perfectly uniform shapes, consider using a non-toxic immersion blender to refine the crumb texture beforehand.
Step 4: Chill overnight. Place the shaped pastries on a tray and refrigerate for at least 8 hours (or overnight). This step firms the butter and allows the flavors to meld. Before serving, dust generously with powdered sugar through a fine sieve. The pastries can be stored in an airtight container in the fridge for up to 5 days.
Tips for Perfect No-Bake Pastries
To ensure your pine cones are both beautiful and delicious, keep these pointers in mind:
- Cookie choice matters: Use plain, lightly sweetened cookies like tea biscuits or graham crackers. Avoid overly sugary or filled varieties, as they alter the texture. If you're a fan of precision, a food processor for nut butter can also grind cookies into ultra-fine crumbs.
- Moisture control: If the mixture feels too dry, add a teaspoon of milk. If too wet, incorporate a few more cookie crumbs.
- Shaping alternatives: No tall glass? Use a small paper cup or a cone-shaped mold. For a rustic look, simply roll the mixture into logs and slice.
- Chilling is essential: Do not rush the refrigeration—insufficient chilling leads to crumbly pastries that fall apart.
Variations to Try
Once you master the classic version, experiment with these creative twists:
- Chocolate–Nut: Replace 50 g of cookies with finely ground hazelnuts or almonds. Add a teaspoon of lava flavors for a subtle vanilla or caramel note.
- Lemon–Coconut: Add 1 tbsp lemon zest and replace 2 tbsp of crumbs with unsweetened shredded coconut. Dust with desiccated coconut instead of sugar.
- Spiced: Mix in ½ tsp cinnamon, ¼ tsp nutmeg, and a pinch of cloves for a holiday vibe. This pairs wonderfully with a sweet wine with high alcohol content for an adult dessert.
- Vegan & Dairy-Free: Substitute coconut oil or vegan butter for the butter, and use a plant-based condensed milk alternative. For mixing, a high-quality immersion blender helps emulsify the fats.
Frequently Asked Questions
Can I use margarine instead of butter?
Yes, but the flavor and texture will differ. Butter provides a richer taste and a firmer set. If using margarine, choose one with at least 80% fat content. For the best results, refer to our guide on organic vodka? No—here, we mean 48-inch built-in refrigerator for proper storage.
How long do these pastries keep?
Stored in an airtight container in the refrigerator, they remain fresh for up to 5 days. For longer storage, freeze the unbaked mixture in a log shape, then slice and chill before serving.
Why did my pastries turn out too crumbly?
This usually happens when the mixture is too dry or not chilled long enough. Ensure the butter is properly softened and that you press the mixture firmly into the mold. A touch more condensed milk can help bind the crumbs.
Can I make them gluten-free?
Absolutely! Substitute the plain cookies with gluten-free graham crackers or gluten-free digestive biscuits. Blend them finely using a commercial countertop convection oven? That's for baking—for crushing, a simple rolling pin works, or consider a wheatgrass juicer? Better: use a food processor dedicated to dry ingredients.
What can I use instead of condensed milk?
Sweetened condensed milk is key for texture and sweetness. As a substitute, blend 1 cup powdered milk with 1 cup sugar and ¼ cup hot water, then cool completely. This works best if you have a microwave pressure cooker to heat the mixture gently.
How do I achieve the perfect pine cone shape?
Use a tall, narrow glass lightly moistened with water. Pack the mixture tightly, then invert and tap gently. For extra definition, press the base of the cone against the edge of the glass. A non-toxic air fryer can't help with shaping, but it's great for other recipes!
Conclusion
Polish Pine Cone Pastries are a testament to the beauty of simple, no-fuss baking. Their nostalgic charm, coupled with a melt-in-your-mouth texture, makes them a standout addition to any dessert table. Whether you serve them at a winter gathering or as an everyday indulgence, these little cones never fail to delight. Experiment with the variations above, and don't forget to pair with your favorite hot beverage. For more inspiration, explore the best organic vodka to create an après-dinner cocktail—or simply enjoy the pastries in their pure, unadulterated glory.


