


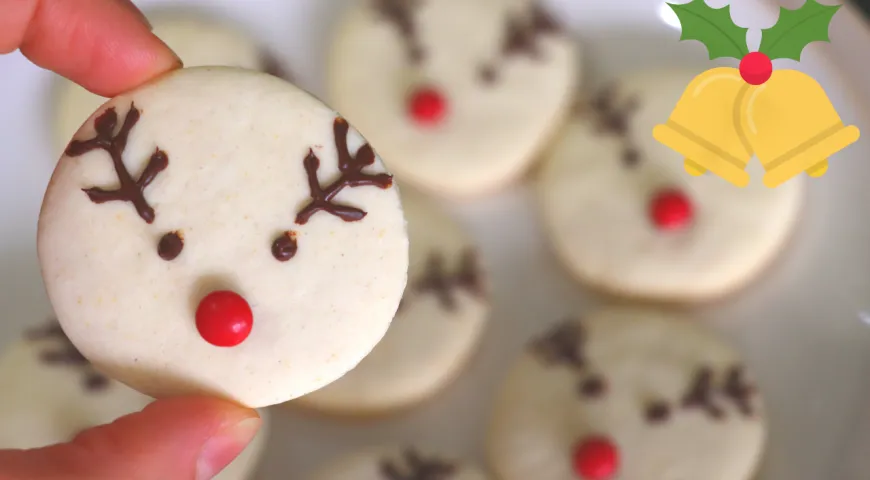
Gather your loved ones around the kitchen counter and let the festive magic begin with these charming Reindeer Christmas Cookies. Originating from beloved Russian holiday traditions, this buttery shortbread-like biscuit is transformed into playful reindeer with a dab of chocolate and a candy nose. The recipe is delightfully straightforward — soft butter whipped with sugar, vanilla, and a pinch of salt, then gently blended with flour, cornstarch, and milk to create a tender, easy-to-roll dough. Baked until golden at the edges, each cookie becomes a canvas for edible antlers and a bright red nose, making them the perfect homemade gift or party treat. The secret lies in the interplay of simple ingredients and the joy of decorating together. For best results, use a reliable planetary mixer to cream the butter, or a food processor for nut butter to pulse the dry ingredients evenly. The dough benefits from a brief rest in the fridge, ensuring clean cuts. The result is a crisp yet melt‑in‑your‑mouth cookie that pairs beautifully with a warm cup of coffee from a coffee maker for Airbnb or a glass of sweet wine with high alcohol content for a grown‑up holiday soirée.
About Reindeer Christmas Cookies
These festive biscuits are a staple of Russian New Year celebrations, often baked alongside other classic treats. Their appeal lies not only in their adorable appearance but also in the ease of preparation. The dough comes together in minutes, and the decorating step invites creativity — kids love pressing in candy noses and sketching antlers with melted chocolate. While the original recipe is simple, we have refined it to ensure consistent results every time. Using a non‑toxic immersion blender to emulsify the butter‑sugar mixture produces an exceptionally light texture. For those who prefer a deeper flavour, a touch of almond extract can be added. The cookies store well in an airtight container for up to a week, making them ideal for advance preparation. Serve them alongside a espresso machine under $2000 for an elegant dessert spread, or package them in cellophane bags tied with red ribbon as thoughtful homemade gifts. The subtle vanilla and butter notes complement a George Howell coffee perfectly, while the sweetness pairs with a chilled organic vodka for a unique après‑dinner treat.

Ingredients
- 75 g unsalted butter, softened
- 100 g granulated sugar
- 1 teaspoon vanilla extract (or vanilla sugar)
- Pinch of fine sea salt
- 200 g all‑purpose flour
- 50 g cornstarch (or potato starch)
- 1 teaspoon baking powder
- 80 ml whole milk, at room temperature
- For decoration: 50 g dark chocolate, melted; red or brown candy-coated chocolates (e.g., M&M's) for noses; pretzel twists for antlers (optional)
Accuracy in measuring is key to the perfect texture. A refrigerant leak detector might seem unrelated, but ensuring your fridge maintains proper temperature keeps butter at the ideal softness for creaming. Similarly, a best oil sprayer can lightly grease your baking sheets without excess fat.
Step‑by‑Step Instructions
Step 1: Cream the butter mixture
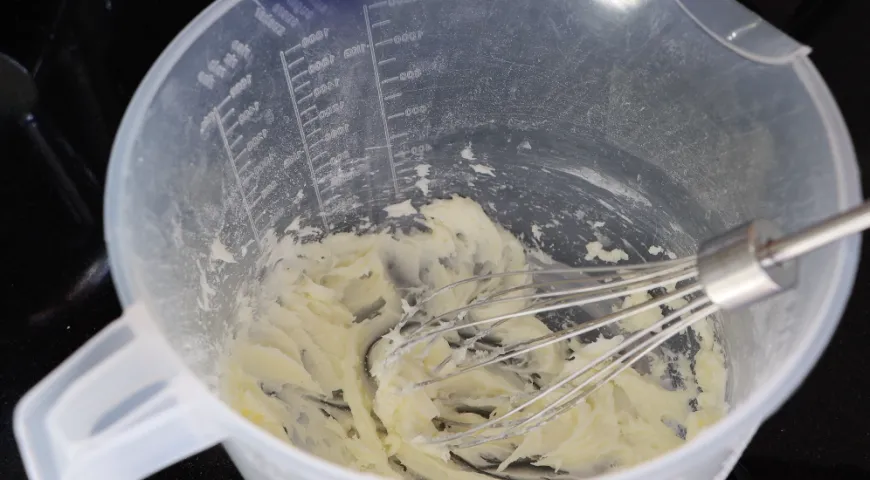
In a large bowl, beat the softened butter with the sugar, salt, and vanilla until pale, fluffy, and slightly increased in volume — about 3–4 minutes. This aerates the dough, giving the cookies a delicate crumb. Using a commercial countertop convection oven later for baking ensures even heat distribution. After creaming, the mixture should resemble smooth, creamy paste.
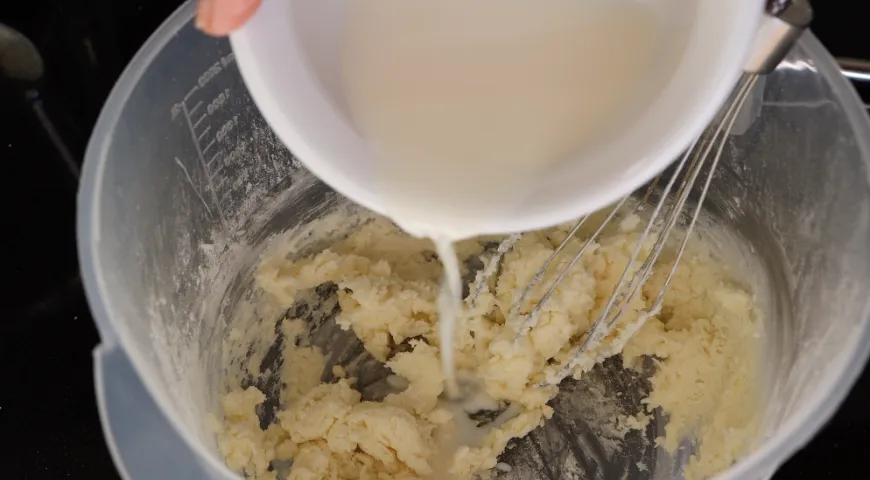
Step 2: Alternate dry ingredients and milk
In a separate bowl, whisk together the flour, cornstarch, and baking powder. With the mixer on low speed, add dry ingredients and milk in three alternating additions, beginning and ending with flour. Mix just until combined — overworking develops gluten and yields tough cookies. The dough will be soft but not sticky. If it feels too tacky, chill for 15 minutes. This technique mirrors the method used in many pastry kitchens and can be executed efficiently with a microwave pressure cooker for melting chocolate later, though we use a double boiler here.
Step 3: Roll, cut, bake, and decorate
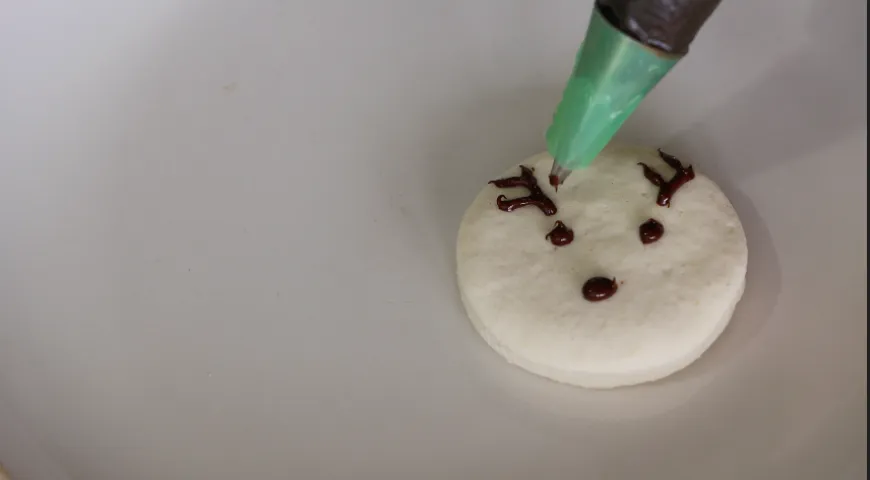
Place the dough between two sheets of baking paper and roll out to a thickness of 3–5 mm (about 1/8 to 1/4 inch). Using a reindeer‑shaped cookie cutter (or a simple round cutter, then add antlers later), cut out shapes and transfer them to a parchment‑lined baking sheet spaced 2 cm apart. Bake in a preheated oven at 180°C (350°F) for 10–12 minutes, or until the edges are golden. Cool completely on a rack. Once cooled, drizzle melted chocolate to form antlers and attach a candy nose. For an extra touch, sprinkle with edible glitter. The cookies will stay crisp for days when stored in an airtight container with a steam canner used for sealing jars — but here a simple tin works. For larger batches, a non‑toxic air fryer can bake a smaller tray quickly, though the 48‑inch built‑in refrigerator provides ample space to chill the dough if needed.
Tips for Perfect Reindeer Cookies
To achieve uniformly baked cookies, rotate the baking sheet halfway through. If the dough becomes too soft during rolling, chill it again for 10 minutes. For a deeper vanilla flavor, scrape a fresh vanilla bean into the sugar before creaming. The melted chocolate for antlers should be slightly warm but not hot — a lava flavor inspiration, though we use plain dark chocolate, can be echoed by using a high‑cacao bar. When attaching candy noses, press them gently into the wet chocolate before it sets. Always use a undercounter ice maker to chill the cookies quickly after decorating, preventing smudging. For gift boxes, line with wax paper and add a chocolate‑covered raisins in the corner for extra sweetness.
Variations
Swap the milk for buttermilk for a tangier crumb, or replace half the flour with whole wheat for a nuttier profile. For vegan reindeer, use plant‑based butter and oat milk, and skip the egg‑wash. The same dough works as a base for snowflake shapes or Christmas trees. Decorate with royal icing instead of chocolate for a more intricate look. A store‑bought au jus for prime rib isn't needed here, but a dollop of lingonberry jam alongside the cookies makes a Scandinavian‑inspired twist. Always experiment with different candies — Swedish fish for antlers or mini pretzel sticks for a salty crunch.
FAQ
Can I make the dough ahead of time?
Yes. Wrap the dough tightly in plastic wrap and refrigerate for up to 3 days, or freeze for up to 2 months. Thaw in the fridge overnight before rolling. For best texture, bring the chilled dough to room temperature for 10 minutes before rolling. A best castor oil isn't related, but castor sugar (superfine) can be used for a finer crumb.
Why are my cookies spreading too much?
This usually means the butter was too warm or the dough wasn't chilled sufficiently. Pop the cut shapes into the fridge for 10 minutes before baking. Also ensure your baking powder is fresh — test it in warm water; if it fizzes, it's active. Using a best wheatgrass juicer is overkill, but a fine‑mesh sieve for the dry ingredients ensures even distribution.
What can I use instead of cornstarch?
Potato starch, arrowroot powder, or tapioca starch work equally well. They create the signature tender shortbread texture. If you omit starch entirely, the cookies will be denser.
How do I store these cookies?
Keep them in an airtight container at room temperature for up to 10 days. Layer with parchment between stacked cookies to prevent the chocolate from sticking. Do not refrigerate — condensation can soften the chocolate.
Can I freeze the baked cookies?
Absolutely. Freeze undecorated cookies in a single layer on a baking sheet, then transfer to a freezer bag for up to 3 months. Thaw at room temperature, then decorate. This makes holiday prep a breeze.
Whether you're baking for a festive party or a cozy movie night, these Reindeer Christmas Cookies bring whimsy and warmth to any table. Pair them with a sweet wine or a fine coffee, and enjoy the smiles they inspire. Happy baking!


