


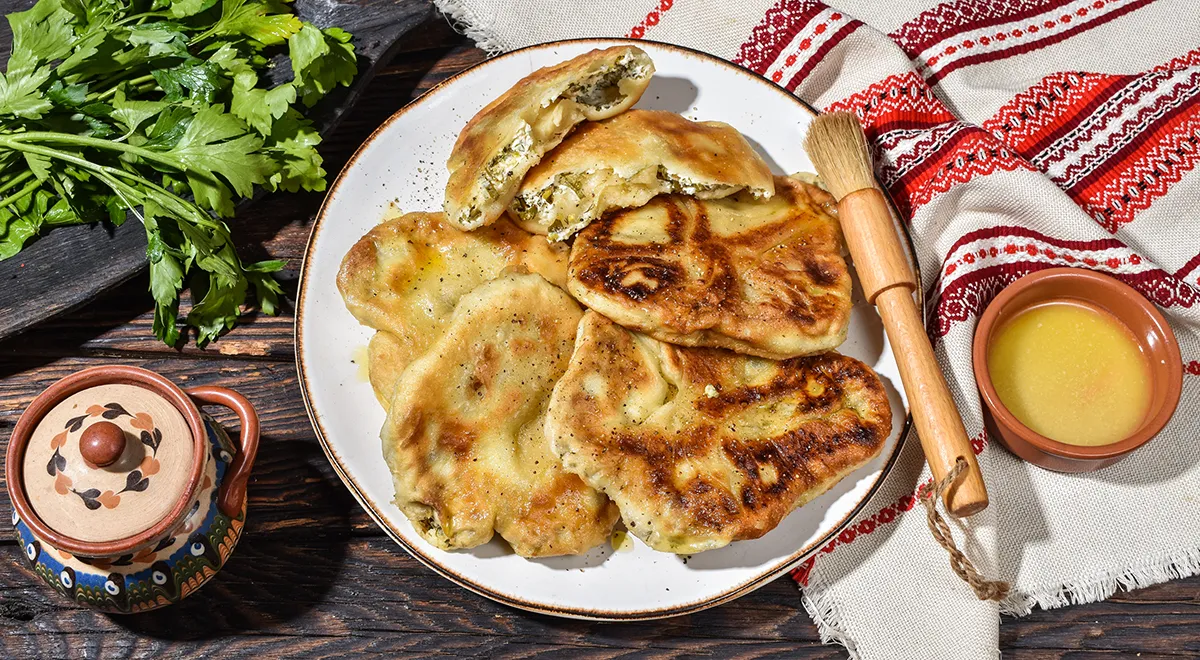
Placindas with cottage cheese and herbs are a cherished Moldovan flatbread that captivates from the very first bite. The combination of a juicy, aromatic filling and a golden, blister-studded crust delivers an unforgettable sensory experience. While simple unleavened dough—flour, water, and salt—is often used, many bakers opt for yeast or kefir-based dough for extra fluffiness. Yet the true showstopper is the stretched dough variety, carefully pulled by hand until it becomes translucent, like tissue paper. This technique yields an impossibly fragile, multi-layered, and crunchy exterior. In Moldova, the fillings vary to suit every palate, but the tangy creaminess of farmer's cheese paired with fresh herbs remains a timeless favorite.
About Placindas: A Moldovan Culinary Treasure
These savory flatbreads, known as placindas, hold a special place in Moldovan cuisine, often served as a hearty snack or a light meal. The name itself derives from the Latin placenta, a testament to ancient Roman influences. Unlike many other stuffed breads, placindas emphasize a thin, almost flaky dough that contrasts beautifully with the moist filling. For the best results, using fresh, high-quality ingredients is key. When preparing the dough, a planetary mixer can streamline the kneading process, ensuring a smooth and elastic texture. Similarly, for blending the cottage cheese and herbs into a homogeneous mixture, a glass food processor offers precision and ease.

Ingredients
- 500 g all-purpose flour
- 500 g 8% cottage cheese (full-fat preferred)
- 250 ml warm water
- 1 large egg
- 25 g fresh parsley
- 25 g fresh dill
- 30 g green onion (scallions)
- 6 tbsp refined vegetable oil (plus more for frying)
- Salt, to taste
- Butter, for brushing (melted)
Step-by-Step Instructions
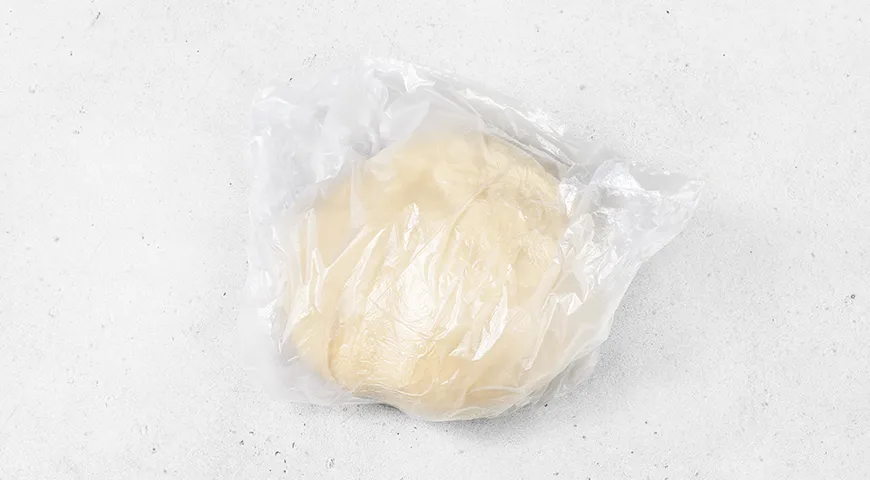
Step 1: Prepare the Dough
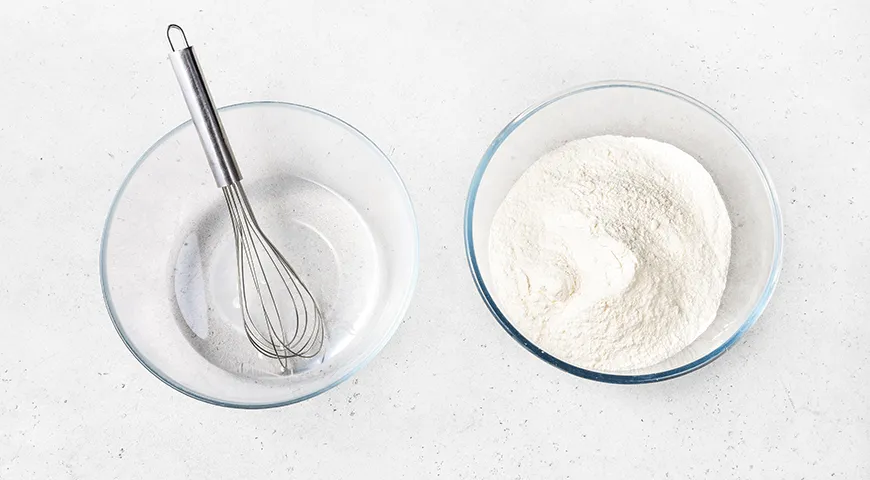
In a bowl, combine warm water with 3 pinches of salt, stirring until dissolved. Add 2 tablespoons of vegetable oil. Gradually incorporate the sifted flour, mixing with a spoon. Then knead by hand to form a soft but not sticky dough. Shape into a ball, cover with plastic wrap, and rest for 15 minutes. This rest allows the gluten to relax, making the dough easier to stretch later.
Step 2: Prepare the Filling
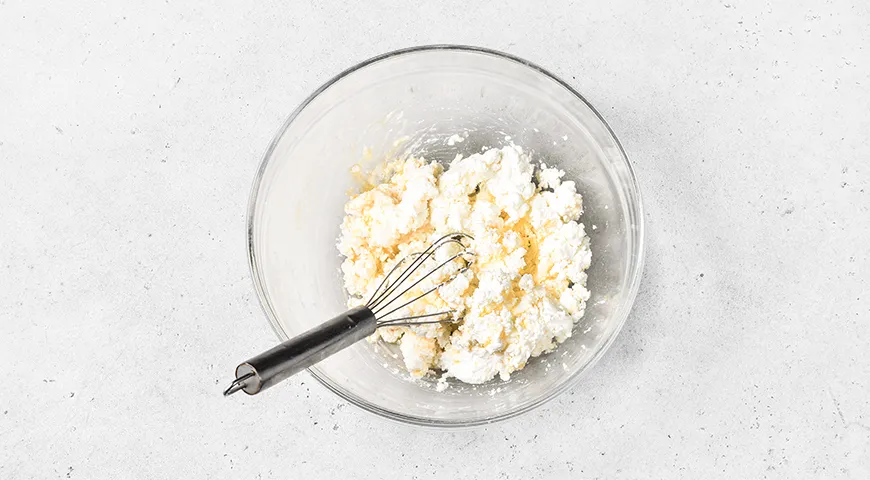
Mash the cottage cheese with a fork until no large lumps remain. Crack in the egg, add salt to taste, and mix until uniform. If the mixture seems dry, incorporate another small egg or 1–2 tablespoons of sour cream.
Step 3: Add Fresh Herbs
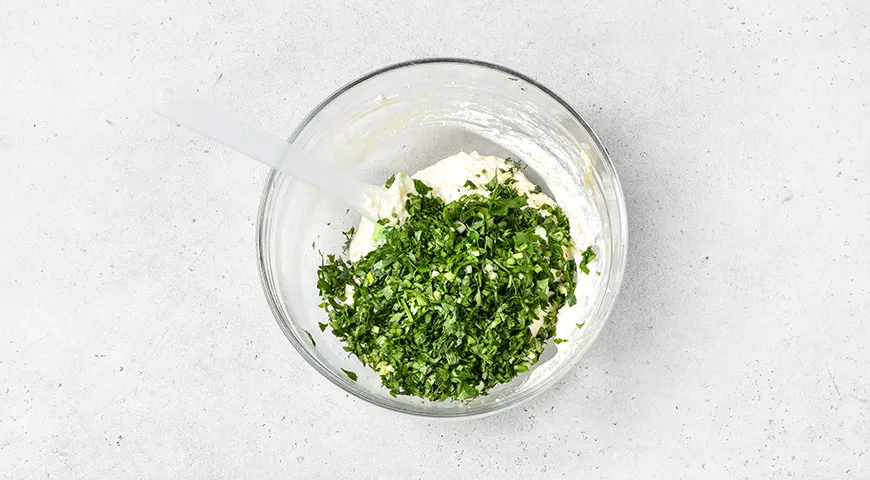
Rinse the parsley, dill, and green onions, then pat dry. Finely chop them and stir into the cottage cheese mixture. At this stage, feel free to season with your favorite spices or dried herbs for an extra layer of flavor.
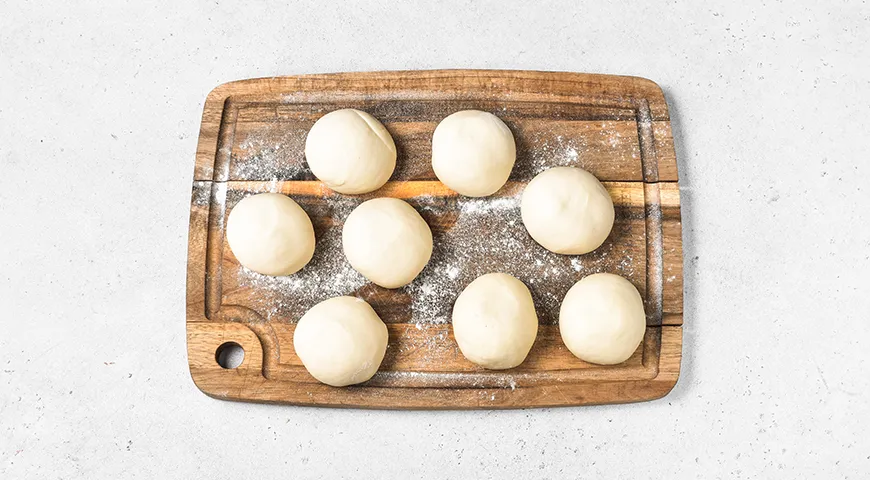
Step 4: Divide the Dough
Knead the rested dough briefly on a floured surface. Roll it into a log and cut into 8 equal pieces. Shape each piece into a small ball and cover with plastic wrap to prevent drying.
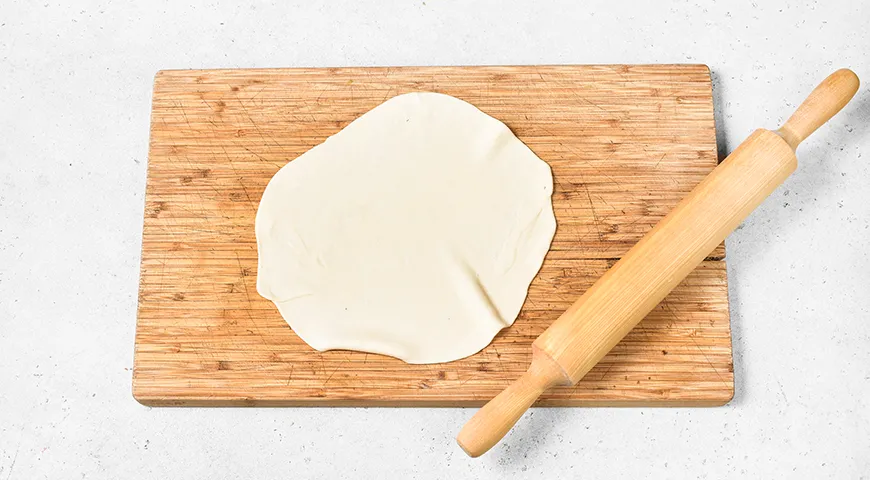
Step 5: Roll Out Each Ball
Lightly flour your work surface. Roll each ball into a thin circle, about 5 mm thick, working from the center outward.
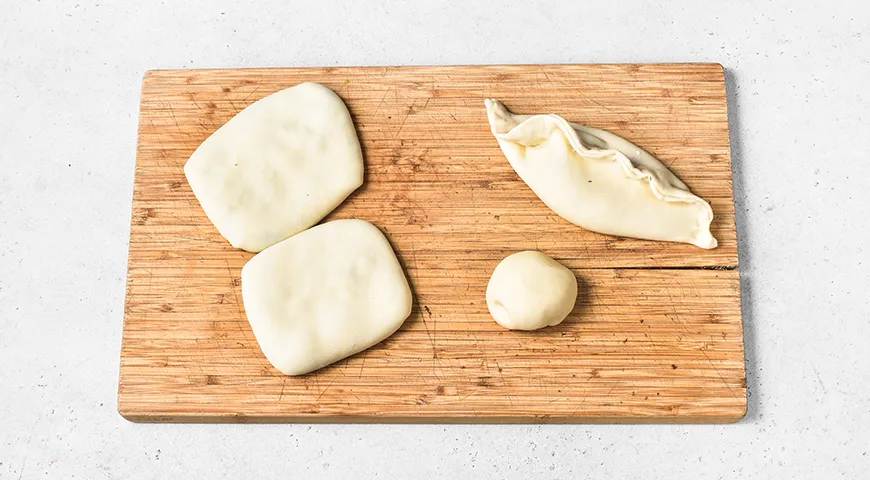
Step 6: Fill and Fold into a Square Packet
Place about 2–3 tablespoons of filling in the center, spreading it to a 1 cm layer, leaving an 8–10 cm border of uncovered dough. Fold two opposite edges toward the center, then the other two, forming a square envelope.
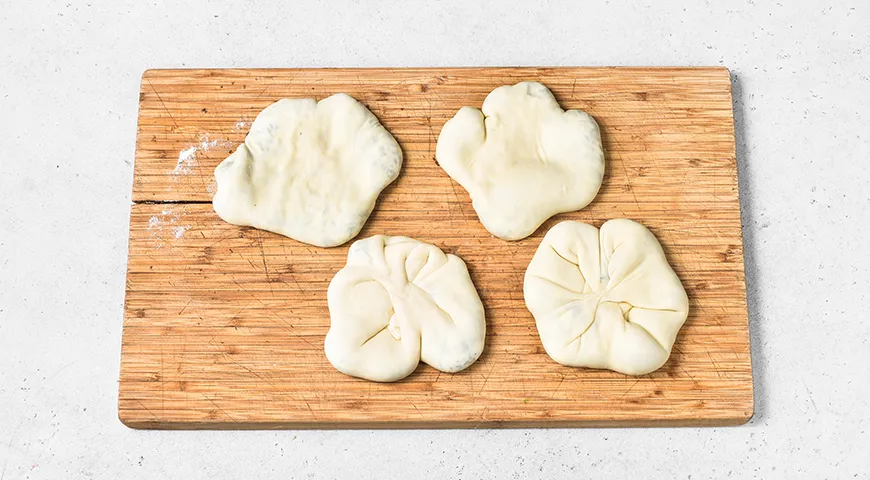
Step 7: Shape into a Round and Flatten
Gently stretch the corners outward and fold them toward the center, creating a roughly round flatbread. Lightly flatten with a rolling pin. Work quickly—the moist filling can soak through the dough if left too long. Prepare 2–3 pieces before frying.
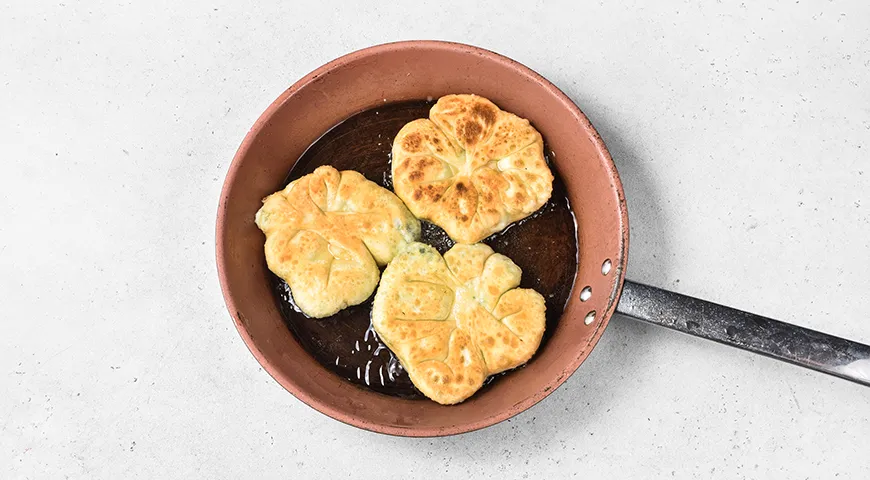
Step 8: Fry Until Golden
Heat 4 tablespoons of vegetable oil in a large skillet over high heat. Carefully place the flatbread seam-side down to seal the filling immediately. Reduce heat to medium, cover, and cook for 2–3 minutes per side until deep golden brown.
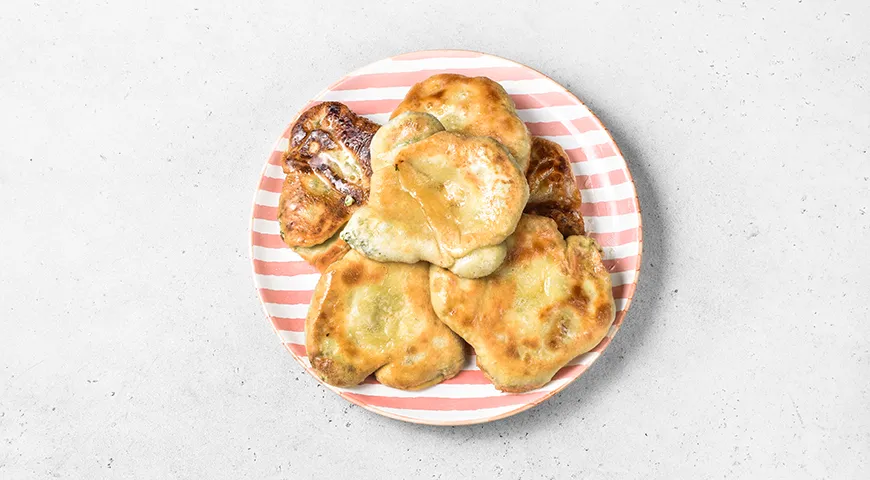
Step 9: Brush with Butter and Serve
As each placinda finishes cooking, transfer it to a serving plate and brush generously with melted butter. Stacking them helps retain heat and lets the butter soak in, keeping them warm and tender longer.
Step 10: Final Presentation
Serve these placindas warm, cut into wedges if desired. They pair beautifully with a dollop of sour cream or a side of fresh salad. The contrast between the crispy, buttery crust and the creamy, herbed cottage cheese is simply irresistible.
Tips for Perfect Placindas
For the dough, use warm water to activate the gluten and ensure elasticity. If stretching by hand, rest the dough longer—up to 30 minutes—to make it easier to pull without tearing. For the filling, choose full-fat cottage cheese (8% or higher) to prevent excess moisture from seeping into the dough during frying. A good non-toxic immersion blender can whip the filling to a silky consistency if desired. When frying, keep the heat controlled: starting high seals the crust, then lowering to medium ensures the inside cooks through without burning. A reliable oil sprayer helps distribute fat evenly for a perfect golden finish.
Variations to Explore
While the classic cottage cheese and herb version is beloved, placindas are endlessly adaptable. Substitute half the flour with whole wheat for a nuttier flavor. For a dairy-free version, use crumbled tofu seasoned with nutritional yeast and herbs. Add finely chopped spinach or nettles for a greener filling. For a sweet twist, omit the herbs and mix cottage cheese with sugar, vanilla, and raisins. Pair with a glass of sweet wine with high alcohol content for a delightful dessert plate. Some home cooks even experiment with chocolate-covered raisins as a garnish, though that strays far from tradition!
Frequently Asked Questions
Can I make the dough ahead of time?
Yes, you can prepare the dough up to 24 hours in advance. Wrap it tightly in plastic and refrigerate. Let it come to room temperature for 30 minutes before shaping.
What if my cottage cheese is too wet?
Place the cottage cheese in a fine-mesh sieve or cheesecloth and let it drain for 30 minutes. Alternatively, you can press it gently to remove excess whey. This prevents a soggy crust.
Can I bake these instead of frying?
Absolutely! Brush the placindas with oil and bake at 200°C (400°F) for about 15–18 minutes, flipping halfway, until golden and crisp. This method yields a slightly different texture but is equally delicious.
How do I store leftover placindas?
Store them in an airtight container at room temperature for up to 2 days. Reheat in a dry skillet over medium heat for 2–3 minutes per side to restore crispness. Avoid microwaving, as it makes them rubbery.
Can I freeze uncooked placindas?
Yes, shape them, place on a parchment-lined tray, and freeze until solid. Then transfer to a freezer bag. Fry directly from frozen, adding a minute or two to the cooking time.
Conclusion
These Moldovan-style placindas with cottage cheese and herbs are a testament to the beauty of simple, rustic cooking. The interplay of a delicate, hand-stretched dough with a creamy, aromatic filling makes them an instant crowd-pleaser. Whether you're a seasoned cook or a beginner, this recipe rewards patience and technique. For best results, equip your kitchen with tools that make the process seamless—a food processor for nut butter might seem unrelated, but it excels at blending cheese and herbs into a paste. And if you're exploring global breads, check out our guide on pa de pessic Catalan sponge for a sweet contrast. Enjoy these placindas fresh, with the butter still glistening, and you'll understand why they're a Moldovan treasure.


