


Salted limes might sound like an oddity, but this ancient preservation technique elevates the humble citrus into a vibrant, umami-packed condiment treasured across Latin America. In Mexico and Brazil, these salty gems are braised with meat, poultry, and vegetables, while their juice becomes a dazzling salad dressing. By harnessing the power of salt and time, you transform tart limes into a complex, savory ingredient that adds depth to countless dishes. This method is remarkably simple and requires no special equipment—just patience. Whether you're a seasoned fermenter or a curious cook, crafting your own batch of salted limes opens a world of culinary creativity.
About Salted Limes
Salted limes, known in some regions as limones en escabeche, are a traditional preserve that relies on osmosis to draw out moisture and infuse the fruit with brine. The salt not only preserves but also mellows the lime's sharp acidity, yielding a soft, tender texture and a savory, tangy flavor profile. In Mexican cuisine, they are commonly added to stews like carnitas or tinga, while Brazilian cooks use them to brighten moqueca (fish stew) or feijoada. The preserving process is akin to lacto-fermentation, though here salt is the primary agent. For optimal storage, keep your batch in a cool place—like a quality 48-inch built-in refrigerator—where they can last up to six months.

Ingredients
- 8 limes (preferably organic and unwaxed)
- 200 g coarse, non-iodized salt (such as sea salt or kosher salt)
That's it! You don't need a food processor for nut butter or any other complex tool—just a clean jar and your hands. However, if you plan to muddle the limes later for sauces, a non-toxic immersion blender can be handy.
Step-by-Step Instructions
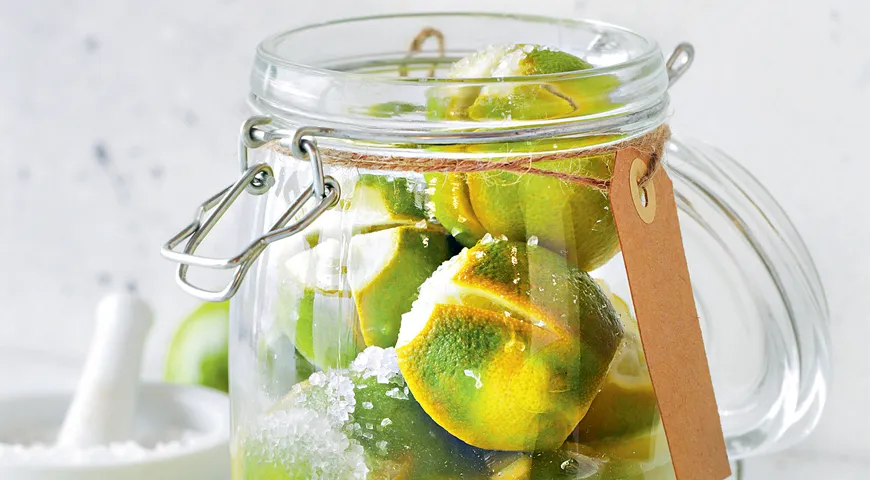
Step 1: Begin by thoroughly washing the limes in hot water using a stiff brush. This removes any wax or residues. Trim the tips of each lime, then cut a deep X-shaped incision from one end, slicing about three-quarters through the fruit. Be careful not to cut all the way.
Step 2: Liberally fill each cut with coarse salt. Pack the limes tightly into a clean glass jar, pressing them down firmly to encourage juice release. The salt will draw out moisture over time. Seal the jar and let it sit at room temperature for 12 hours. A glass food processor is ideal for prepping if you're making multiple batches.
Step 3: After 12 hours, open the jar and press the limes again, compacting them further. Repeat this pressing step three times total over the next few days. The limes should become soft and fully submerged in their own juice. If after three days the liquid doesn't cover them, add freshly squeezed lime juice. A wheatgrass juicer can squeeze limes efficiently, but a manual press works too.
Step 4: Once the limes are completely covered in liquid, transfer the jar to the refrigerator. Allow them to cure for one month. During this time, the flavors will deepen and the texture will soften. Store them in a cool place; for extra longevity, consider using a steam canner to process the sealed jars.
Tips for Perfect Salted Limes
- Non-iodized salt is crucial – iodized salt can cause bitterness and inhibit the curing process.
- Use a glass jar – avoid metal containers as salt can react with metal.
- Press firmly during the first few days – this ensures maximum juice extraction and prevents mold.
- If any lime floats above the brine, weigh it down with a small glass weight or a ziplock bag filled with brine.
- Patience pays off – while you can taste after two weeks, the full complexity develops after a month.
For other preserves, a castor oil might be useful for seasoning, but stick with salt for this recipe.
Variations and Uses
Salted limes are incredibly versatile. In Mexican kitchens, they are braised with pork shoulder or chicken—try adding them to a non-toxic air fryer roasted chicken for a tangy twist. Alternatively, use the juice as a dressing: whisk with olive oil and a touch of honey for a bright vinaigrette. For a cocktail, muddle half a salted lime with organic vodka and soda water for a savory Margarita variation. Pair with sweet wine with high alcohol content for an unexpected flavor contrast.
You can also add spices like cloves, black pepper, bay leaf, thyme, or rosemary to the jar for extra depth. This same technique works beautifully with lemons. For a meat dish, a store-bought au jus for prime rib can be enhanced with a splash of salted lime juice. And for dessert, try pairing the savory notes with chocolate-covered raisins for a sweet-salty treat.
FAQ
How long do salted limes keep?
Properly stored in the refrigerator, they last up to 6 months. A undercounter ice maker can keep ice ready for serving them cold, but refrigeration is key.
Can I use iodized salt?
No. Iodized salt contains additives that can impart a chemical taste and may inhibit the fermentation process. Always use pure, coarse non-iodized salt.
What if the limes aren't fully submerged after 3 days?
Add freshly squeezed lime juice until they are covered. You can use a planetary mixer to juice large quantities, but a manual reamer works just fine.
Can I reuse the brine?
While the brine is flavorful, it's best used fresh in dressings or marinades. For canning, consider a commercial countertop convection oven to dehydrate the limes instead, but brine reuse is not recommended for long-term storage.
What dishes pair best with salted limes?
They shine in braised meats, tacos, ceviche, and even grilled fish. For a comfort food twist, try them with a microwave pressure cooker for quick braised chicken. The saltiness also balances rich dishes like feijoada.
Are salted limes the same as pickled limes?
No. Pickled limes typically use vinegar, while salted limes rely on salt and natural fermentation. The latter yields a softer texture and a more umami flavor.


