


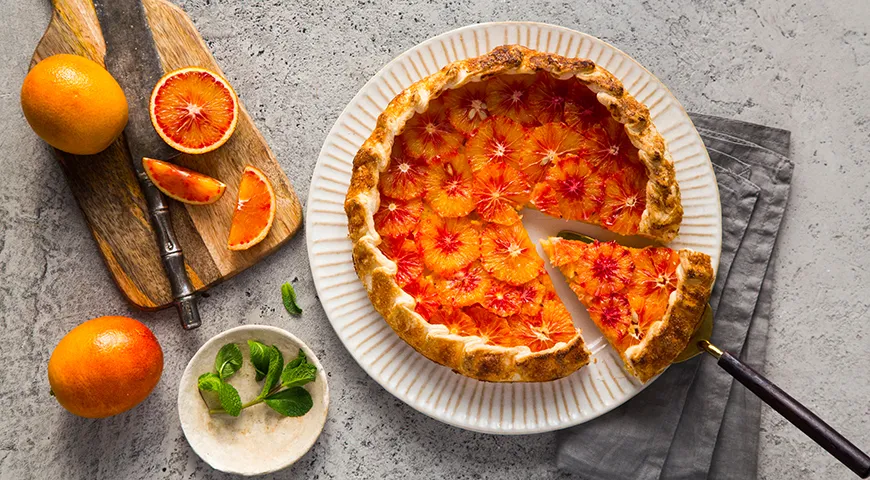
There is a quiet elegance in a dessert that looks as though it took hours of meticulous folding and filling, yet comes together in minutes. This simple open orange tart—known in Russia as a galeta—achieves that very illusion. Built on a foundation of store‑bought puff pastry and crowned with bright citrus, it is the kind of effortless showstopper that belongs in every home baker’s repertoire. The contrast between flaky, buttery layers and juicy, caramelized oranges creates a symphony of textures, while a hint of cold butter and a light sprinkling of sugar coax out the fruit’s natural sweetness. Whether you serve it as a teatime treat, a brunch centerpiece, or a casual dinner finale, this tart proves that simplicity can be spectacular.
About the Recipe
This open orange tart is a variation of the classic French galette des fruits, adapted for the Russian home kitchen. The key to its speed is the use of ready‑made puff pastry, which eliminates the need for laborious dough rolling. By layering orange segments and slices over a bed of crunchy oat flakes (or rusks, as the original suggests), you create a barrier that prevents the pastry from becoming soggy. A final brush of egg wash and a dusting of sugar transform the top into a glossy, amber‑flecked crown. The result is a tart that is simultaneously rustic and refined—perfect for those moments when you want a homemade dessert without the fuss.

Ingredients
- 500 g puff pastry (preferably all‑butter, thawed)
- 4–5 large oranges
- 3–4 tbsp oat flakes (or panko breadcrumbs as a substitute)
- 3–4 tbsp granulated sugar (plus extra for sprinkling)
- 30 g cold unsalted butter, thinly sliced
- 1 egg + 1 tbsp milk (for wash, optional)
For best results, use organic oranges with thin skin, as they are sweeter and less bitter. If you prefer a gluten‑free version, choose gluten‑free puff pastry and substitute the oat flakes with gluten‑free breadcrumbs. A quality food processor can quickly turn oats into a fine crumb, though a blender works just as well—check out this best non‑toxic immersion blender review for a versatile option that handles both crushing and blending.
Step‑by‑Step Instructions
Step 1: Prepare the Oven and Pastry
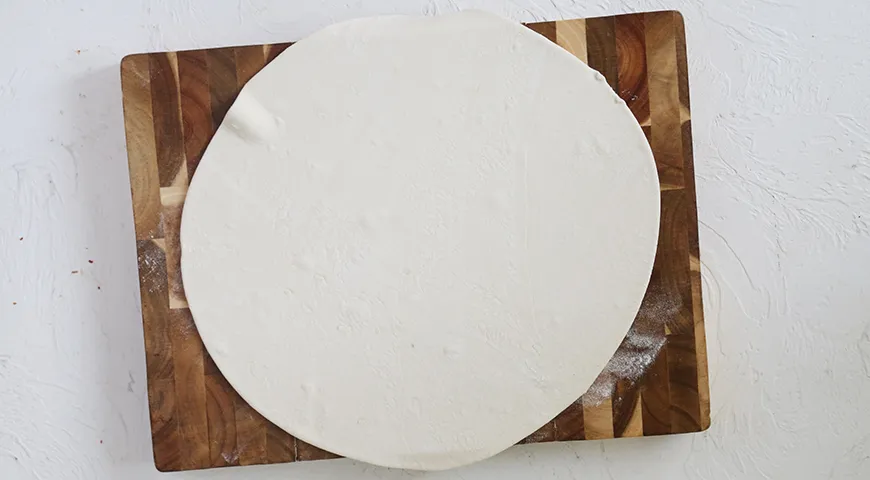
Preheat your oven to 200°C (400°F). Meanwhile, thaw the puff pastry according to the package instructions. On a lightly floured surface, use a large pot lid or a dinner plate as a guide to cut out a circle about 28–30 cm in diameter. If you prefer two smaller tarts (which bake more evenly and stay crisper), cut out two circles of about 18 cm each. Transfer the pastry circle(s) to a parchment‑lined baking sheet and refrigerate while you prepare the fruit.
Step 2: Prepare the Oranges
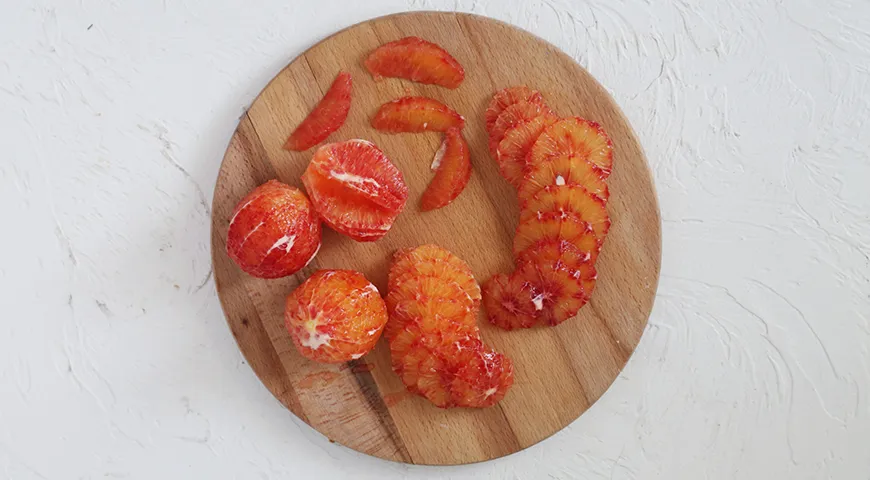
Using a sharp knife, cut off the peel and white pith from all oranges. For two of the oranges, slice them into thin rounds (about 5 mm thick). From the remaining oranges, cut out individual segments: slice between the membranes to release the juicy flesh. Work over a bowl to collect any juice, which you can save for a glaze or a cocktail. The segments offer a neat, elegant look, while the slices create a beautiful pattern on top.
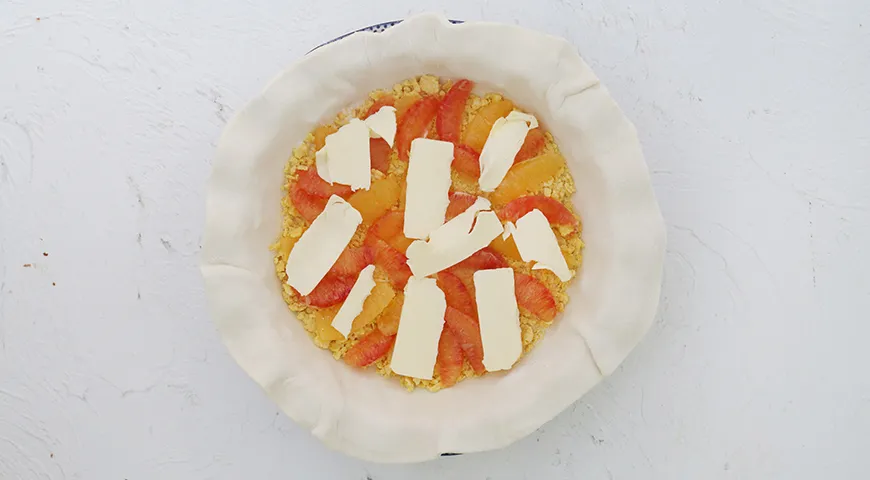
Step 3: Build the Base Layer
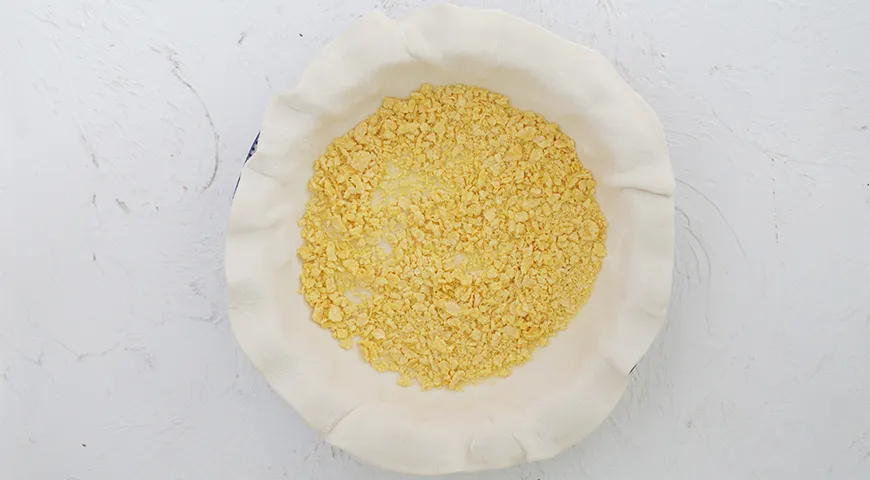
In a small blender or food processor, pulse the oat flakes into a coarse crumb. Sprinkle this crumb evenly over the centre of the pastry, leaving a 2–3 cm border uncovered. This layer absorbs excess moisture from the oranges, keeping the pastry crisp. Arrange the orange segments over the crumbs, then scatter a tablespoon of sugar and lay the thin slices of cold butter on top. Be careful not to place topping too close to the edge—fold that border over the filling later.
Step 4: Add the Top Layer and Finish
Artfully arrange the orange rounds over the segments, overlapping slightly if needed. Sprinkle the remaining sugar over the top. For a glossy, golden finish, whisk the egg with the milk and brush it over the exposed pastry border. This step is optional but highly recommended—it gives the crust a beautiful sheen. Fold the 2–3 cm border up over the edge of the filling, pleating as you go to create a rustic rim.
Step 5: Bake and Cool
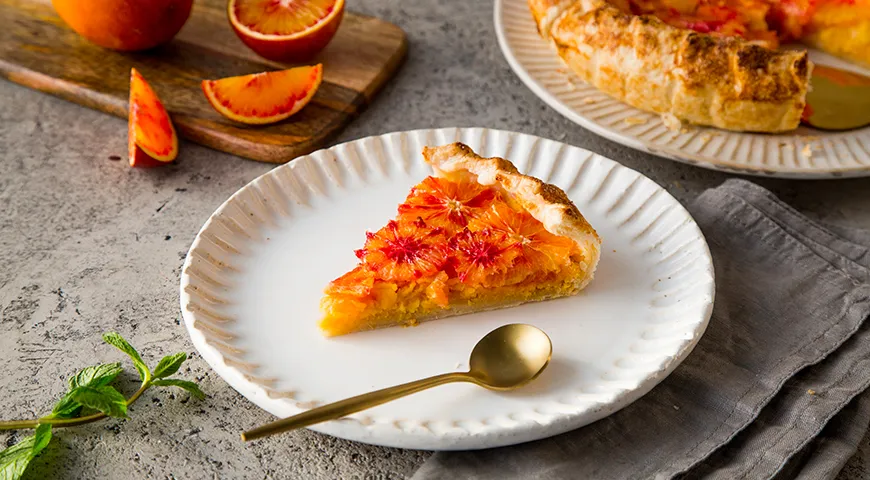
Place the tart(s) in the preheated oven and bake for 30–35 minutes, until the pastry is puffed and deep golden and the oranges are tender and lightly caramelized. Remove from the oven and let cool on the baking sheet for at least 10 minutes before sliding onto a wire rack. Serve warm or at room temperature. The tart is best enjoyed the same day, though leftovers can be stored in an airtight container at room temperature for up to two days—reheat briefly to restore crispness.
Tips for Success
- Keep the pastry cold: Chilling the cut circle before baking helps it rise evenly. If your kitchen is warm, pop it in the freezer for 10 minutes.
- Don’t skip the crumb layer: Oat flakes or breadcrumbs act as a sponge, preventing a soggy bottom. For extra flavour, toast the crumbs lightly beforehand.
- Use a sharp, thin‑bladed knife for slicing oranges to avoid crushing the delicate flesh. A good chef’s knife is a worthwhile investment.
- Bake two small tarts instead of one large one—they cook more evenly and the pastry stays flakier. This trick also makes slicing and serving easier.
- Experiment with citrus combinations: Try mixing blood oranges, tangerines, or even add a few thin lemon slices for a zestier kick.
Variations
This rustic tart is endlessly adaptable. Swap the oranges for juicy peaches and nectarines in summer, or use pears and apples in autumn. For a savoury twist, omit the sugar and top with caramelized onions and goat cheese. If you prefer a sweeter finish, drizzle the cooled tart with a simple icing made from powdered sugar and orange juice. For an extra indulgence, serve with a dollop of whipped cream or a scoop of vanilla bean ice cream—contrasting temperatures and textures elevate the experience.
FAQ
Can I use homemade puff pastry instead of store‑bought?
Absolutely. If you have a recipe you trust, homemade all‑butter puff pastry will give an even flakier, more buttery result. Just remember to chill the dough thoroughly before rolling. A planetary mixer can simplify the butter‑lamination process.
How do I keep the tart from becoming soggy?
The oat crumb layer is key—it absorbs juices released by the oranges. Also, avoid overloading the pastry with fruit; leave a generous border. If you’re using very juicy oranges, consider pre‑draining the slices on paper towels for a few minutes.
Can I make this tart ahead of time?
You can prepare the components: cut the pastry, segment the oranges, and pulse the crumbs a day in advance (store each separately in the fridge). Assemble and bake just before serving for optimal texture. Leftover baked tart keeps well for two days at room temperature.
What else can I use instead of oat flakes?
Panko breadcrumbs, ground almonds, or even crushed digestive biscuits work well. The goal is a dry, neutral‑flavoured layer that prevents moisture from seeping into the pastry. A food processor can turn nuts into a fine meal quickly.
Can I grill the tart instead of baking?
While a conventional oven gives the most even heat, you could try baking in a non‑toxic air fryer at 180°C for 15–20 minutes, checking frequently. The tart may brown faster due to circulating hot air, so keep an eye on the pastry.
Is this tart suitable for freezing?
Baked tart freezes well—wrap it tightly in plastic and foil and freeze for up to one month. Thaw at room temperature, then reheat in a 180°C oven for 5–7 minutes to restore crispness. The unbaked assembled tart can also be frozen for up to three months; bake directly from frozen, adding 5–10 minutes to the baking time.
Why You’ll Love This Tart
This orange tart is the embodiment of a concept that every home cook craves: maximum impact with minimum effort. The vibrant colour alone brightens any table, and the aroma of baked citrus is intoxicating. Because it uses everyday ingredients—oranges, puff pastry, butter, sugar—it can be thrown together on a whim. And yet, the finished dessert has a polished, professional look that impresses guests. It pairs beautifully with a cup of strong coffee or a glass of sweet dessert wine. For those who love to bake but are short on time, this tart is a revelation.
Final Thoughts
Baking should bring joy, not stress. This simple orange tart delivers that joy in spades—golden, flaky, fragrant, and brimming with the natural brightness of winter citrus. Whether you make it for a holiday brunch, a lazy Sunday afternoon, or a last‑minute dinner party, it will earn a permanent spot in your recipe collection. And when the compliments come pouring in, you can smile knowingly, because the secret is out: the best desserts are often the simplest. For more effortless baking inspiration, explore our guide to the best wall oven microwave combo with air fryer or learn how a built‑in refrigerator can streamline your kitchen workflow. Happy baking!


