


There are few comfort foods as universally beloved as a stack of tender, golden blini cradling a rich, savory meat filling. This classic Russian dish, bliny s myasom, transforms simple pantry staples into something truly extraordinary. Pan-fried to a perfect crisp on the outside and bursting with juicy, seasoned beef within, these stuffed blini are the ultimate indulgence for a cozy dinner or festive gathering. Serve them immediately with a dollop of sour cream, thick yogurt, or your favorite dipping sauce. For a lighter twist, pair them with a crisp salad of fresh seasonal vegetables to balance the richness. This recipe, honed over generations, delivers that irresistible combination of textures and flavors that keeps everyone reaching for just one more.
A Timeless Classic: The Story of Blini with Meat
Blini have been a cornerstone of Eastern European cuisine for centuries, symbolizing warmth, hospitality, and the sun itself during Maslenitsa celebrations. While sweet blini are delightful, the savory version stuffed with meat speaks to a deeper culinary tradition of hearty, nourishing fare. Using a sturdy mixer for the batter ensures a silky, lump-free texture, which is the foundation of perfect blini. The combination of tender wheat flour pancakes and slow-cooked, perfectly seasoned beef is a testament to the beauty of simple ingredients. This recipe walks you through every step, from creating the ideal batter to achieving that coveted golden-brown crust when frying the stuffed blini.

Ingredients – The Building Blocks of Flavor
- For the Blini Batter: 500 g wheat flour, 600 ml water, 1–2 eggs, 1 tbsp vegetable oil (plus more for frying), 1 tsp sugar, 1 pinch salt.
- For the Beef Filling: 500 g beef (chuck or brisket), 1–2 medium onions, 2 tbsp vegetable oil, 50 g unsalted butter, salt, freshly ground black pepper to taste.
Each component has a purpose: the sugar aids browning, the butter in the filling adds a luxurious richness, and the right oil sprayer or brush helps you grease the pan evenly without overloading.
Step-by-Step – Crafting the Perfect Blini
Step 1: Prepare the Batter – In a large mixing bowl, combine the flour, salt, and sugar. Whisk the egg(s) lightly, then gradually pour in the water while whisking continuously to avoid lumps. Once smooth, stir in the vegetable oil. Let the batter rest at room temperature for 15–20 minutes; this relaxes the gluten for tender blini.

Step 2: Cook the Blini – Heat a non-stick skillet over medium heat and lightly grease with oil. Pour a small ladleful of batter, tilting the pan to spread it thinly. Cook until the edges lift and the underside is golden, then flip and cook the other side. Repeat with remaining batter. For consistent results, consider using a non-toxic air fryer for a healthier alternative, though pan-frying gives that classic crispy rim.

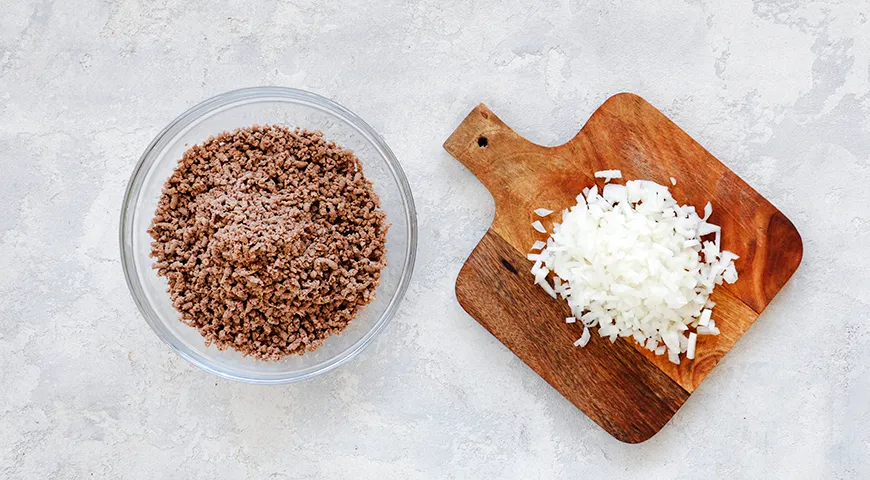
Step 3: Prepare the Beef Filling – Boil the beef in salted water until tender, about 1.5 hours after boiling. Drain and let cool slightly, then grind using a meat grinder or high-quality glass food processor for a fine texture. Meanwhile, peel and finely chop the onions.
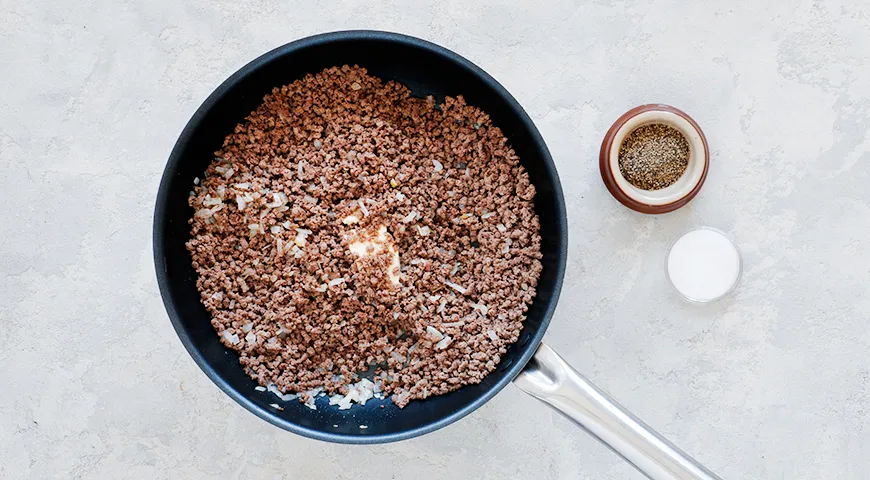
Step 4: Sauté the Filling – Heat vegetable oil in a skillet over medium heat. Add the chopped onion and sauté until translucent and lightly golden. Stir in the ground beef, season with salt and pepper, and add the butter. Cook, stirring, until the mixture is fragrant and slightly browned. Remove from heat.
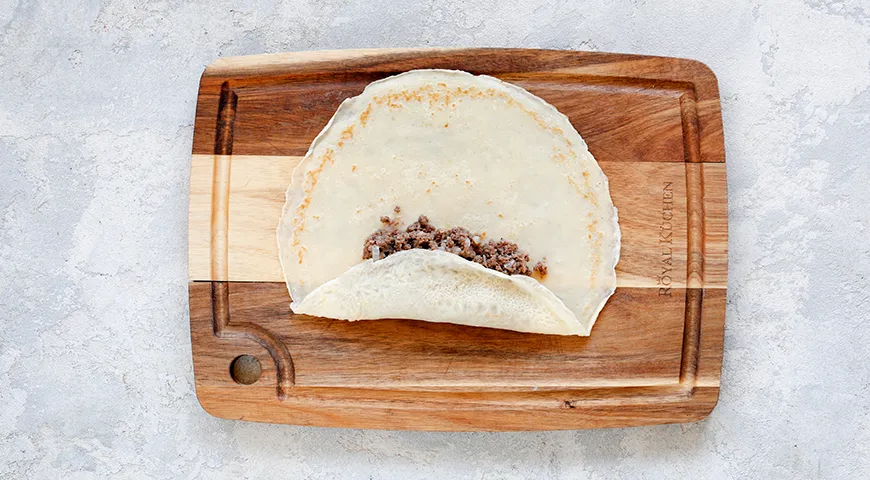
Step 5: Assemble the Stuffed Blini – Place a small portion of the filling along one edge of a blini. Fold the sides in, then roll tightly into a tube. For a smoother filling texture, you can pulse the cooked beef with a food processor if preferred. Repeat with remaining blini.
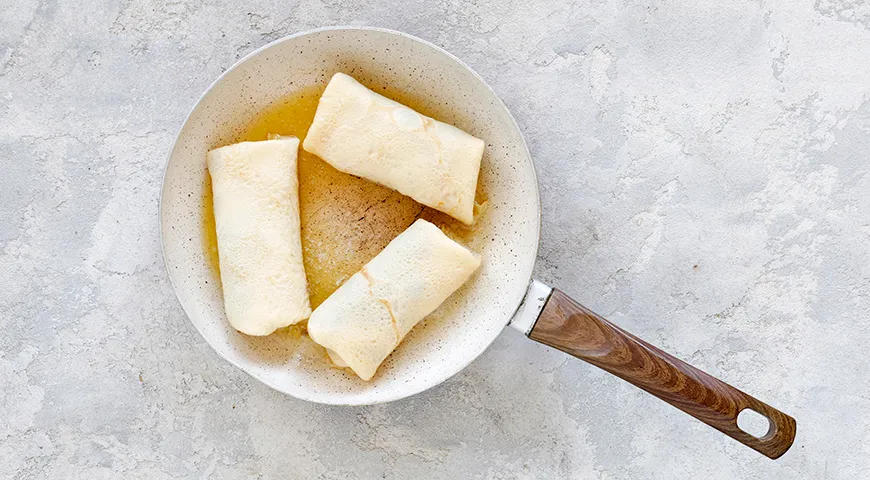
Step 6: Pan-Fry Until Golden – Heat a generous drizzle of oil in a large skillet over medium-low heat. Place the stuffed blini seam-side down and fry until deep golden on all sides. A well-controlled heat ensures they brown beautifully without drying out. Serve piping hot.
Tips for the Ultimate Stuffed Blini
Achieving restaurant-quality blini at home is all about attention to detail. Let the batter rest to avoid rubbery pancakes. When frying the filled blini, use medium-low heat—they should turn evenly golden without burning. An immersion blender can quickly smooth the batter if lumps persist. For a richer filling, substitute half the beef with pork or add a handful of sautéed mushrooms. To keep the blini warm while you finish the batch, place them on a baking sheet in a low oven (100°C).
Variations to Explore
The beauty of this recipe lies in its adaptability. Swap the beef for ground lamb or turkey for a different protein profile. Add finely chopped dill or parsley to the filling for freshness. For a dairy-free version, use olive oil instead of butter. A high-quality juicer can also help you create vibrant vegetable-based sauces to accompany the blini. If you’re short on time, prepare the filling a day ahead; it only deepens in flavor. And for a truly decadent twist, sprinkle grated cheese inside the blini before rolling—it melts into a gooey center.
Frequently Asked Questions
Can I use a different type of flour?
Yes, you can substitute up to half the wheat flour with buckwheat flour for a nuttier, more traditional Russian blini. For gluten-free options, experiment with a gluten-free flour blend but note the texture may be slightly more delicate.
How should I store leftover stuffed blini?
Allow them to cool completely, then store in an airtight container in the refrigerator for up to three days. Reheat in a skillet with a little oil to restore the crispness. Avoid microwaving, as it makes them soggy.
Can I freeze the blini?
Absolutely. Freeze the assembled, uncooked blini on a baking sheet, then transfer to a freezer bag. Fry directly from frozen, adding a few extra minutes. You can also store them in a dedicated freezer drawer to maintain quality.
What if my blini batter is too thick or too thin?
The batter should be about the consistency of heavy cream—it should spread easily on the pan but not be watery. Add a splash of water if too thick, or a tablespoon of flour if too thin. A microwave pressure cooker can quickly cook extra filling if you need to adjust quantities.
Can I make the blini without eggs?
Yes, you can omit the eggs or replace each with a tablespoon of flaxseed meal mixed with three tablespoons of water. The texture may be slightly less tender, but they still work well. Pair them with a high-quality organic vodka for a classic Russian-inspired pairing.
Pan-fried stuffed blini with beef are more than just a meal—they’re a journey into the heart of home cooking. Whether you serve them as a hearty dinner or a party appetizer, each bite delivers the soulful warmth that only a lovingly prepared dish can provide. Embrace the process, trust the technique, and enjoy the irresistible rewards.


